
Laravel 10 Custom User Registration & Login Tutorial
In this tutorial, I will show how to create Custom User Registration & Login in Laravel 10 with step by step guide.
Although, Laravel provides a convenient way to create user registration and login using Auth Scaffolding. However, in several cases, you may want to create your own custom user registration and login with additional fields either on registration or on login form.
I am using Laravel 10 and Bootstrap v5.2, which are the latest version of both frameworks.
Readers Also Read: Laravel 10 Livewire User Registration and Login
Readers Also Read: Laravel 10 Livewire CRUD Application
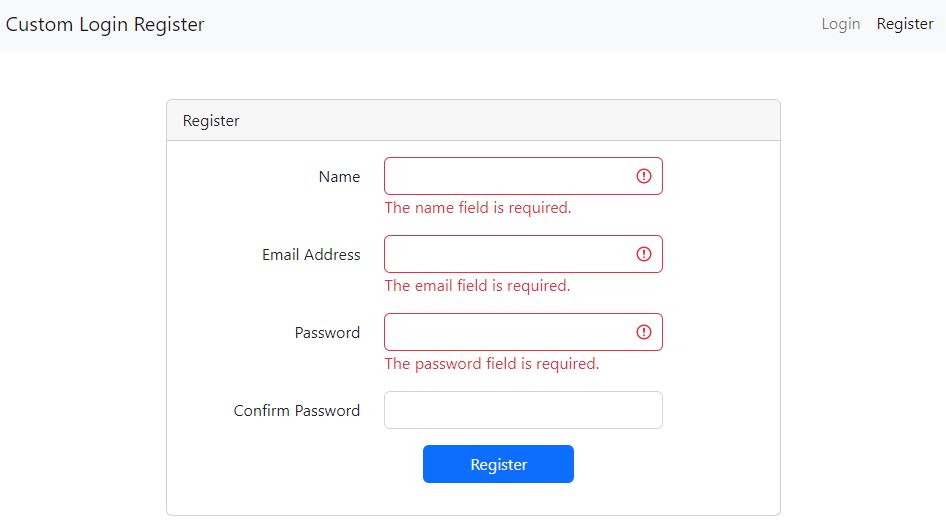
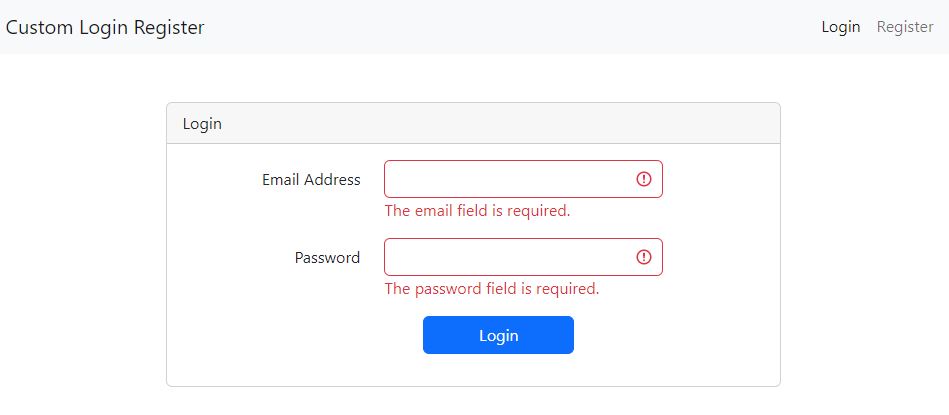
Following are the screenshots of the application.
Registration Page
Login Page
Readers Also Read: Laravel User Roles and Permissions
Without further delay, lets start building Laravel 10 Custom User Registration and Login.
Steps to Create Laravel 10 Custom User Registration and Login
Follow the below simple steps to create Laravel custom user registration and login.
- Install Laravel 10 App
- Create Database & Configure Database Credentials
- Migrate Tables to Database
- Create Custom Registration Login Routes
- Create a LoginRegister Controller
- Define Your New Home
- Create Login Register Blade View Files
- Run Laravel Development Server
1. Install Laravel 10 App
Open the command prompt or terminal window & go to your development directory where you want to install Laravel custom user registration & login application. I usually work on workspace directory on my Desktop.
cd desktop\workspaceNow install the Laravel latest version with name CustomLoginRegister using the below command.
composer create-project --prefer-dist laravel/laravel:^10 CustomLoginRegisterAnd then move to the CustomLoginRegister directory using the below command.
cd CustomLoginRegister2. Create Database & Configure Database Credentials
In this step, we will first create our database with name custom_login_register and then configure your database credentials in the .env file which is available in your Laravel application root.
DB_CONNECTION=mysql
DB_HOST=127.0.0.1
DB_PORT=3306
DB_DATABASE=custom_login_register
DB_USERNAME=your_db_username
DB_PASSWORD=your_db_password
I am using XAMPP for MySQL database, if you don’t have MySQL database then you can install XAMPP on Windows 10/11.
3. Migrate Tables to Database
Laravel comes with the user table therefore we do not need to create user model or migration, we just need to migrate all Laravel basic tables into our database.
Run the below command to migrate tables.
php artisan migrate4. Create Custom Registration Login Routes
In this step, we will need to create our custom user registration and login routes, copy paste the below code in routes/web.php file.
<?php
use Illuminate\Support\Facades\Route;
use App\Http\Controllers\Auth\LoginRegisterController;

/*
|--------------------------------------------------------------------------
| Web Routes
|--------------------------------------------------------------------------
|
| Here is where you can register web routes for your application. These
| routes are loaded by the RouteServiceProvider within a group which
| contains the "web" middleware group. Now create something great!
|
*/

Route::get('/', function () {
    return view('welcome');
});

Route::controller(LoginRegisterController::class)->group(function() {
    Route::get('/register', 'register')->name('register');
    Route::post('/store', 'store')->name('store');
    Route::get('/login', 'login')->name('login');
    Route::post('/authenticate', 'authenticate')->name('authenticate');
    Route::get('/dashboard', 'dashboard')->name('dashboard');
    Route::post('/logout', 'logout')->name('logout');
});
In the above code, we have defined the routes for user registration form and registration form submission which will store user data into our user table.
Then we define the routes for our login form and processing login form, it will authenticate the user, if it gets success, it will be redirected to the dashboard.
Finally, we defined our dashboard and logout routes which will be accessed only after logged in to the application.
We have also given names to our each routes for the convenience use.
Readers Also Read: Laravel 10 CRUD Application
5. Create a LoginRegister Controller
In this step, we will create a controller with name LoginRegisterController with the six (6) methods in it which are listed below.
- register() -> To display registration form
- store() -> To store the registration form data
- login() -> To display the login form
- authenticate() -> To authenticate the login user credentials
- dashboard() -> To display the dashboard screen to authenticated user
- logout() -> To perform the logout operation by the user
As their names, you can presume what these methods will do, register() method will display the registration form and store() method will process the registration form data and save into database.
Similarly, login() method will display login form and authenticate() method will process the login form after login form submission.
Run the below command to create a LoginRegisterController controller.
php artisan make:controller Auth\LoginRegisterControllerThe above command will create a controller in the app\Http\Controllers\Auth\ directory, simply copy and paste the below code in the app\Http\Controllers\Auth\LoginRegisterController.php
<?php
namespace App\Http\Controllers\Auth;
use App\Models\User;
use Illuminate\Http\Request;
use App\Http\Controllers\Controller;
use Illuminate\Support\Facades\Auth;
use Illuminate\Support\Facades\Hash;
class LoginRegisterController extends Controller
{
/**
* Instantiate a new LoginRegisterController instance.
*/
public function __construct()
{
$this->middleware('guest')->except([
'logout', 'dashboard'
]);
}
/**
* Display a registration form.
*
* @return \Illuminate\Http\Response
*/
public function register()
{
return view('auth.register');
}
/**
* Store a new user.
*
* @param \Illuminate\Http\Request $request
* @return \Illuminate\Http\Response
*/
public function store(Request $request)
{
$request->validate([
'name' => 'required|string|max:250',
'email' => 'required|email|max:250|unique:users',
'password' => 'required|min:8|confirmed'
]);
User::create([
'name' => $request->name,
'email' => $request->email,
'password' => Hash::make($request->password)
]);
$credentials = $request->only('email', 'password');
Auth::attempt($credentials);
$request->session()->regenerate();
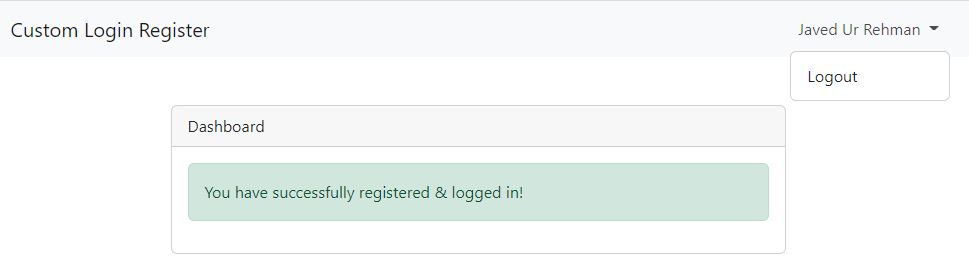
return redirect()->route('dashboard')
->withSuccess('You have successfully registered & logged in!');
}
/**
* Display a login form.
*
* @return \Illuminate\Http\Response
*/
public function login()
{
return view('auth.login');
}
/**
* Authenticate the user.
*
* @param \Illuminate\Http\Request $request
* @return \Illuminate\Http\Response
*/
public function authenticate(Request $request)
{
$credentials = $request->validate([
'email' => 'required|email',
'password' => 'required'
]);
if(Auth::attempt($credentials))
{
$request->session()->regenerate();
return redirect()->route('dashboard')
->withSuccess('You have successfully logged in!');
}
return back()->withErrors([
'email' => 'Your provided credentials do not match in our records.',
])->onlyInput('email');
}
/**
* Display a dashboard to authenticated users.
*
* @return \Illuminate\Http\Response
*/
public function dashboard()
{
if(Auth::check())
{
return view('auth.dashboard');
}
return redirect()->route('login')
->withErrors([
'email' => 'Please login to access the dashboard.',
])->onlyInput('email');
}
/**
* Log out the user from application.
*
* @param \Illuminate\Http\Request $request
* @return \Illuminate\Http\Response
*/
public function logout(Request $request)
{
Auth::logout();
$request->session()->invalidate();
$request->session()->regenerateToken();
return redirect()->route('login')
->withSuccess('You have logged out successfully!');;
}
}
We have additionally added a constructor in the above controller to add the middleware to our routes, only logout and dashboard routes can be accessible after logged in to the application, all the other routes can be accessed without login to the system.
This is mandatory as we do not want anyone to access the login or registration form after successfully logged into the application.
Similarly, we also do not want anyone to access the logout and dashboard without logged in to the system.
This is why we have added the constructor and defined our middleware.
Readers Also Read: Laravel 10 REST API using Passport Authentication
6. Define Your New Home
As we have defined our middleware for auth and guest routes so what If anyone tries to access the login URL after successful login, well Laravel will redirect the user to the default home route which actually does not exist in our application.
In our case, it is the dashboard route which is our default route for those who tries to access the login or register after successful login.
So we will need to make a small change in file CustomLoginRegister\app\Providers\RouteServiceProvider.php
Just replace the home with dashboard. Find the below line of code in the RouteServiceProvider.php
public const HOME = '/home';And replace it with the following line.
public const HOME = '/dashboard';7. Create Login Register Blade View Files
We will need to create an auth directory in resources/views/ and then create the following files in it to make the views of our login, registration and dashboard.
- layouts.blade.php
- register.blade.php
- login.blade.php
- dashboard.blade.php
layouts.blade.php is the main layout of our login & registration application, so just copy and paste the below code in file resources/views/auth/layouts.blade.php
<!DOCTYPE html>
<html lang="en">
<head>
    <meta charset="UTF-8">
    <meta name="viewport" content="width=device-width, initial-scale=1.0">
    <meta http-equiv="X-UA-Compatible" content="ie=edge">
    <title>Laravel 10 Custom User Registration & Login Tutorial - AllPHPTricks.com</title>
    <link href="https://cdn.jsdelivr.net/npm/[email protected]/dist/css/bootstrap.min.css" rel="stylesheet" integrity="sha384-rbsA2VBKQhggwzxH7pPCaAqO46MgnOM80zW1RWuH61DGLwZJEdK2Kadq2F9CUG65" crossorigin="anonymous">
</head>
<body>

    <nav class="navbar navbar-expand-lg bg-light">
        <div class="container">
          <a class="navbar-brand" href="{{ URL('/') }}">Custom Login Register</a>
          <button class="navbar-toggler" type="button" data-bs-toggle="collapse" data-bs-target="#navbarNavDropdown" aria-controls="navbarNavDropdown" aria-expanded="false" aria-label="Toggle navigation">
            <span class="navbar-toggler-icon"></span>
          </button>
          <div class="collapse navbar-collapse" id="navbarNavDropdown">
            <ul class="navbar-nav ms-auto">
                @guest
                    <li class="nav-item">
                        <a class="nav-link {{ (request()->is('login')) ? 'active' : '' }}" href="{{ route('login') }}">Login</a>
                    </li>
                    <li class="nav-item">
                        <a class="nav-link {{ (request()->is('register')) ? 'active' : '' }}" href="{{ route('register') }}">Register</a>
                    </li>
                @else
                    <li class="nav-item dropdown">
                        <a class="nav-link dropdown-toggle" href="#" role="button" data-bs-toggle="dropdown" aria-expanded="false">
                            {{ Auth::user()->name }}
                        </a>
                        <ul class="dropdown-menu">
                        <li><a class="dropdown-item" href="{{ route('logout') }}"
                            onclick="event.preventDefault();
                            document.getElementById('logout-form').submit();"
                            >Logout</a>
                            <form id="logout-form" action="{{ route('logout') }}" method="POST">
                                @csrf
                            </form>
                        </li>
                        </ul>
                    </li>
                @endguest
            </ul>
          </div>
        </div>
    </nav>

    <div class="container">
        @yield('content')
        <div class="row justify-content-center text-center mt-3">
            <div class="col-md-12">
                <p>Back to Tutorial:
                    <a href="https://www.allphptricks.com/laravel-custom-user-registration-and-login-tutorial/"><strong>Tutorial Link</strong></a>
                </p>
                <p>
                    For More Web Development Tutorials Visit: <a href="https://www.allphptricks.com/"><strong>AllPHPTricks.com</strong></a>
                </p>
            </div>
        </div>
    </div>

<script src="https://cdn.jsdelivr.net/npm/[email protected]/dist/js/bootstrap.bundle.min.js" integrity="sha384-kenU1KFdBIe4zVF0s0G1M5b4hcpxyD9F7jL+jjXkk+Q2h455rYXK/7HAuoJl+0I4" crossorigin="anonymous"></script>
</body>
</html>
register.blade.php is the registration page of our application, copy and paste the below code in file resources/views/auth/register.blade.php
@extends('auth.layouts')

@section('content')

<div class="row justify-content-center mt-5">
    <div class="col-md-8">

        <div class="card">
            <div class="card-header">Register</div>
            <div class="card-body">
                <form action="{{ route('store') }}" method="post">
                    @csrf
                    <div class="mb-3 row">
                        <label for="name" class="col-md-4 col-form-label text-md-end text-start">Name</label>
                        <div class="col-md-6">
                          <input type="text" class="form-control @error('name') is-invalid @enderror" id="name" name="name" value="{{ old('name') }}">
                            @if ($errors->has('name'))
                                <span class="text-danger">{{ $errors->first('name') }}</span>
                            @endif
                        </div>
                    </div>
                    <div class="mb-3 row">
                        <label for="email" class="col-md-4 col-form-label text-md-end text-start">Email Address</label>
                        <div class="col-md-6">
                          <input type="email" class="form-control @error('email') is-invalid @enderror" id="email" name="email" value="{{ old('email') }}">
                            @if ($errors->has('email'))
                                <span class="text-danger">{{ $errors->first('email') }}</span>
                            @endif
                        </div>
                    </div>
                    <div class="mb-3 row">
                        <label for="password" class="col-md-4 col-form-label text-md-end text-start">Password</label>
                        <div class="col-md-6">
                          <input type="password" class="form-control @error('password') is-invalid @enderror" id="password" name="password">
                            @if ($errors->has('password'))
                                <span class="text-danger">{{ $errors->first('password') }}</span>
                            @endif
                        </div>
                    </div>
                    <div class="mb-3 row">
                        <label for="password_confirmation" class="col-md-4 col-form-label text-md-end text-start">Confirm Password</label>
                        <div class="col-md-6">
                          <input type="password" class="form-control" id="password_confirmation" name="password_confirmation">
                        </div>
                    </div>
                    <div class="mb-3 row">
                        <input type="submit" class="col-md-3 offset-md-5 btn btn-primary" value="Register">
                    </div>

                </form>
            </div>
        </div>
    </div>
</div>

@endsection
login.blade.php is the login page of our application, copy and paste the below code in file resources/views/auth/login.blade.php
@extends('auth.layouts')

@section('content')

<div class="row justify-content-center mt-5">
    <div class="col-md-8">

        <div class="card">
            <div class="card-header">Login</div>
            <div class="card-body">
                <form action="{{ route('authenticate') }}" method="post">
                    @csrf
                    <div class="mb-3 row">
                        <label for="email" class="col-md-4 col-form-label text-md-end text-start">Email Address</label>
                        <div class="col-md-6">
                          <input type="email" class="form-control @error('email') is-invalid @enderror" id="email" name="email" value="{{ old('email') }}">
                            @if ($errors->has('email'))
                                <span class="text-danger">{{ $errors->first('email') }}</span>
                            @endif
                        </div>
                    </div>
                    <div class="mb-3 row">
                        <label for="password" class="col-md-4 col-form-label text-md-end text-start">Password</label>
                        <div class="col-md-6">
                          <input type="password" class="form-control @error('password') is-invalid @enderror" id="password" name="password">
                            @if ($errors->has('password'))
                                <span class="text-danger">{{ $errors->first('password') }}</span>
                            @endif
                        </div>
                    </div>
                    <div class="mb-3 row">
                        <input type="submit" class="col-md-3 offset-md-5 btn btn-primary" value="Login">
                    </div>

                </form>
            </div>
        </div>
    </div>
</div>

@endsection
dashboard.blade.php is the dashboard page of our application, copy and paste the below code in file resources/views/auth/dashboard.blade.php
@extends('auth.layouts')

@section('content')

<div class="row justify-content-center mt-5">
    <div class="col-md-8">
        <div class="card">
            <div class="card-header">Dashboard</div>
            <div class="card-body">
                @if ($message = Session::get('success'))
                    <div class="alert alert-success">
                        {{ $message }}
                    </div>
                @else
                    <div class="alert alert-success">
                        You are logged in!
                    </div>
                @endif
            </div>
        </div>
    </div>
</div>

@endsection
Make one more minor change in your welcome.blade.php, as home route is hardcoded in it, just search it and replace with dashboard.
Search the below code
url('/home')and replace it with the following
url('/dashboard')8. Run Laravel Development Server
Now we have successfully completed all the steps that are required to develop Laravel 10 custom user registration and login, so run the Laravel development server to test our application using the below command.
php artisan serveAnd then open your web browser and browser or visit the following URL to test your Laravel 10 custom user registration and login.
http://127.0.0.1:8000/registerIf you want to send email verification to newly registered users then you can follow my tutorial on Laravel 10 User Registration with Email Verification.
If you found this tutorial helpful, share it with your friends and developers group.
I spent several hours to create this tutorial, if you want to say thanks so like my page on Facebook, Twitter and share it.
Facebook Official Page: All PHP Tricks
Twitter Official Page: All PHP Tricks

Mabuhay!
Thank you for this guide. I have this error
InvalidArgumentException
PHP 8.1.10
10.48.29
View [auth.login] not found.
auth.login was not found.
Are you sure the view exists and is a .blade.php file?
Dear Christopher,
Thanks for the appreciation.
Laravel is unable to find your login view on resources/views/auth/view.blade.php make sure that there is no spelling error and the view should be present in the correct directory, otherwise Laravel can’t find the login view file.
This tutorial was incredibly helpful! I appreciate the clear instructions and code snippets for customizing user registration and login in Laravel 10. I’ve been struggling to implement this on my own, but your step-by-step guide made it so much easier. Thank you for sharing!
Dear Mike,
Thanks for the appreciation.
This tutorial was incredibly helpful! The step-by-step instructions made the custom user registration and login process much clearer for me. I especially appreciated the code snippets and explanations—thank you for sharing your knowledge!
Thanks Teddy, I am glad to know that found tutorial and explanation useful.
This tutorial helps me a lot.
Dear Birupaksha Das,
Glad to know that you found it useful.
Hi, how to apply ThrottlesLogins trait to this, it is not working, please advise.
Call to undefined method App\Http\Controllers\Auth\LoginRegisterController::middleware()
Have you tried to download the code then run it?
This tutorial saved my time, thanks for sharing 🙂 Good job bro
Dear Carter,
Glad to know that you found it helpful.
return view(‘resources.Dashboard’);
Thanks for the straight forward and helpful article on how to create a login, register, dashboard page in Laravel 10, God bless you
Dear George,
Glad to know that you found it helpful.
Happy Coding. 🙂
View [auth.register] not found.
bagaimana cara memperbaikinya
Make sure that you have created a register.blade.php file in auth directory.
View [auth.register] not found
Dear Suresh,
Kindly make sure that you have created register.blade.php in resources/views/auth directory. If you already created this view file then you can paste anything to test if this file is working. For example, you can simply write hello world, if this is printing on the screen then you can copy paste the actual code from this tutorial.
Very Good
Dear Aadeena, Glad to know that you find our tutorial helpful.
Hey, thanks for the tutorial. But I am getting the error message:
Target class [LoginRegisterController] does not exist.
Can you help?
Dear Chali,
Make sure that you have created LoginRegisterController.php file in Auth directory and it contain all the codes which I shared in this tutorial.
View [auth.register] not found.
Dear Aslam,
You will need to create all view files in the relevant directory. If you are getting this error, this means either there is no view with that name or may be misspelled the auth or register.blade.php file. Kindly check them in the resources/views/ directory.
Thanks
Glad to know that you find it useful.
Hello,
This was super helpful thank you!
Dear Adrian,
I am glad that you like it 🙂
Thank you so much
You are welcome bro. I am glad that you found my tutorial helpful. 🙂
373 / 5,000
Translation results
Translation result
Don’t worry, there seems to be an error in the Register Controller login section. (Should insert be used instead of the word create)
Please check if it should be corrected with insert code or not?
” User::create([
‘name’ => $request->name,
’email’ => $request->email,
‘password’ => Hash::make($request->password)
]);
“
Dear Jassem,
Thanks for your input, you can user either Laravel static create method or you can instantiate a new object of your class and then insert data into your application.
It is totally up to you, I found Laravel static create method more convenient, therefore I prefer it.
Sir, its working good but I have a question why we need to change the url(‘/home’) in welcome.blade.php to url(‘/dashboard’) I am new on Laravel so please help me I have some more ques like this one can you please help me to understand, I am willing to understand these questions please help me to understand these questions
Dear Danish,
I changed it so that user will be redirected to this route as home route does not exist in our web.php, I intentionally changed home route to dashboard so I have to change it on the relevant place, if you are not interested to change your home route then you can use your default home route. But make sure that your define your home route in your web.php. Hope this solve your issue and confusion.