
Simple Laravel 10 CRUD Application Tutorial
In this tutorial, we will learn about Laravel CRUD operations by developing a complete Laravel 10 CRUD application with simple, easy and step by step guide.
You can implement this Laravel CRUD operations in Laravel 8, 9 and 10 versions. This code will work in all of these versions and hopefully will work in Laravel 11 as well.
In this example, we will use the Laravel 10 with the latest Bootstrap 5.3 version.
Readers Also Read: Laravel 10 Livewire CRUD Application
What is CRUD?
In the field of computer programming, Create, Read, Update, and Delete (CRUD) are the four basic and main operations of persistent storage.
This means if you are developing an application via computer programming then in almost all cases, you are actually building a CRUD applications.
Readers Also Read: Laravel 10 Custom User Registration & Login Tutorial
Create: When you build an application, it will create new record that will store in your database which is a persistent storage.
Read: After saving that information in your database, you will need to display that record to the user for reading purpose.
Update: You may also need to update this record to rectify the information into your database.
Delete: And finally, you may want to delete that record if it is no longer required.
Readers Also Read: Laravel 10 REST API using Passport Authentication
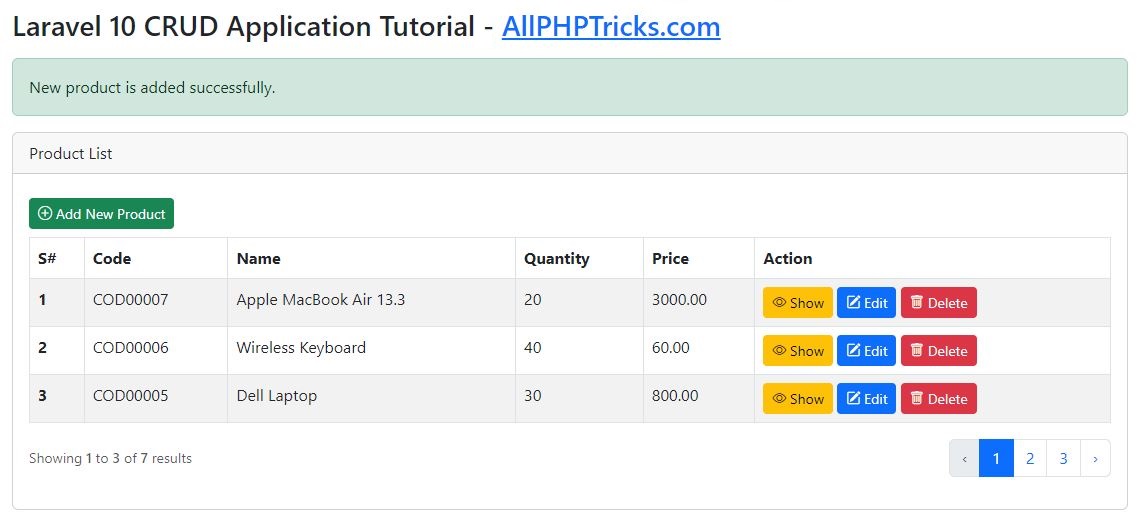
In this tutorial, we will create a products table using Laravel 10 application and perform CRUD operations on it that will store all product information such as product code, name, quantity, price and description.
We will add new product, view products, update product and delete products from database.
Following are the screenshots of the Laravel 10 CRUD application with example of products table.
Product List Page
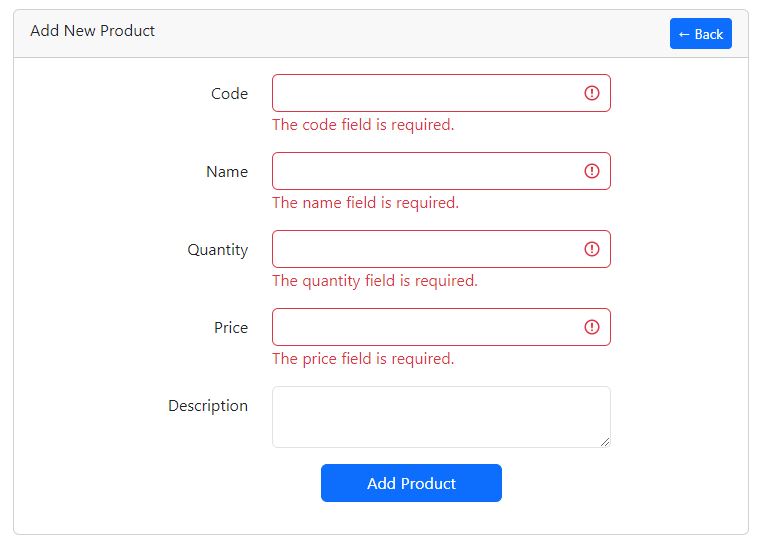
Add New Product Page
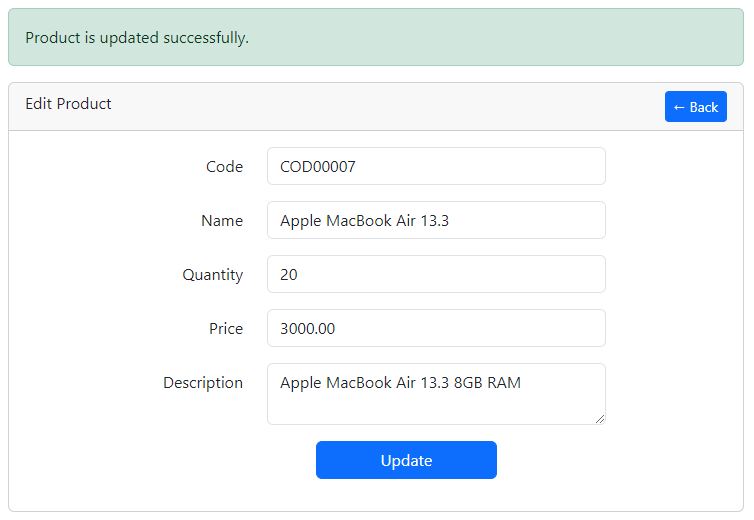
Edit Product Page
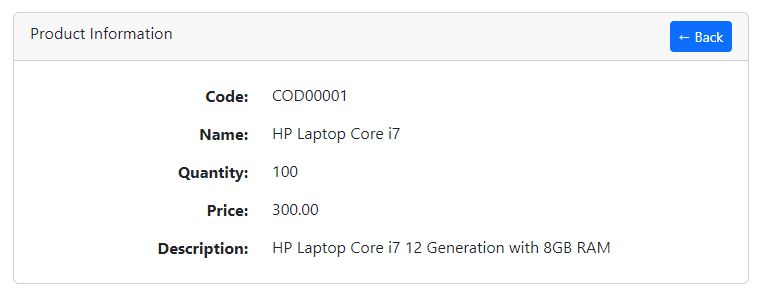
Show Product Page
Readers Also Read: Laravel User Roles and Permissions
So now without further delay, lets start developing a simple Laravel 10 CRUD application with product table example.
Steps to Create Laravel 10 CRUD Application
Follow the below easy steps to create a simple Laravel CRUD application.
- Install Laravel 10 App
- Configure Database Credentials
- Create a Model with Migration, Resource Controller and Requests for Validation
- Update Product Migration
- Migrate Tables to Database
- Define Product Resource Routes
- Update Code in Product Model
- Update Code in Product Controller
- Update Code in Product Store and Update Requests
- Enable Bootstrap 5 in AppServiceProvider
- Create Product Resource Blade View Files
- Run Laravel Development Server
1. Install Laravel 10 App
Open the command prompt/terminal window and head to the directory where you want to install Laravel 10 CRUD application. For example like below.
cd desktop\workspaceTo install Laravel, you must have installed composer in your system. If you don’t have it then first learn how to install composer on windows 11.
Install the Laravel 10 application with name laravel_10_crud by running the below command on your command prompt/terminal window.
composer create-project --prefer-dist laravel/laravel:^10 laravel_10_crudAfter that first move to that newly created directly by running the below command.
cd laravel_10_crud2. Configure Database Credentials
In this step, we need to configure database credentials for Laravel 10 CRUD app. Update the .env file which is available on the application root directory.
Open the .env file and enter your own database credentials details.
Database Credentials:
DB_CONNECTION=mysql
DB_HOST=127.0.0.1
DB_PORT=3306
DB_DATABASE=your_db_name
DB_USERNAME=your_db_username
DB_PASSWORD=your_db_password
Make sure that you have already installed MySQL database and PHP 8.1 in your machine, if you don’t have it then you can get it by installing XAMPP on Windows 11.
3. Create a Model with Migration, Resource Controller and Requests for Validation
Now, we need to create a Model, Migration, Resource Controller and Requests for Validation of products table.
We can create each of these individually, but we can also create them just by running a single command on terminal/command prompt which will create them in a single go.
Just run the below command:
php artisan make:model Product -mcr --requestsIn here –m flag is for migration of the Model, cr flag is for a resource controller, and –requests to create custom requests for resource controller which will create both store and update requests for validation.
You will get the following message on your terminal after running the above command.

4. Update Product Migration
We need to update product migration, just navigate to the directory laravel_10_crud\database\migrations and there you will see our product migration file like below.
YYYY_MM_DD_TIMESTAMP_create_products_table.php
Open this file and paste the following code in it.
<?php

use Illuminate\Database\Migrations\Migration;
use Illuminate\Database\Schema\Blueprint;
use Illuminate\Support\Facades\Schema;

return new class extends Migration
{
    /**
     * Run the migrations.
     */
    public function up(): void
    {
        Schema::create('products', function (Blueprint $table) {
            $table->id();
            $table->string('code')->unique();
            $table->string('name');
            $table->integer('quantity');
            $table->decimal('price', 8, 2);
            $table->text('description')->nullable();
            $table->timestamps();
        });
    }

    /**
     * Reverse the migrations.
     */
    public function down(): void
    {
        Schema::dropIfExists('products');
    }
};
5. Migrate Tables to Database
After creating the product migration, we need to migrate tables into our database.
All you need is to run the below command in your terminal to migrate all migrations tables along with products table.
php artisan migrate6. Define Product Resource Routes
In this step, we will need to define our product resource routes in web.php. Copy and paste the below code in your routes/web.php file.
<?php

use Illuminate\Support\Facades\Route;
use App\Http\Controllers\ProductController;

/*
|--------------------------------------------------------------------------
| Web Routes
|--------------------------------------------------------------------------
|
| Here is where you can register web routes for your application. These
| routes are loaded by the RouteServiceProvider and all of them will
| be assigned to the "web" middleware group. Make something great!
|
*/

Route::get('/', function () {
    return view('welcome');
});
Route::resource('products', ProductController::class);
After defining the routes, you can check your application routes by running the below command.
php artisan route:listAfter running above command, you will see something like below:

7. Update Code in Product Model
Just go to the app\Models\Product.php and update the following code in Product.php file.
<?php

namespace App\Models;

use Illuminate\Database\Eloquent\Factories\HasFactory;
use Illuminate\Database\Eloquent\Model;

class Product extends Model
{
    use HasFactory;

    protected $fillable = [
        'code',
        'name',
        'quantity',
        'price',
        'description'
    ];
}
We need to assign column names to $fillable to use mass assignment, otherwise Laravel will not add data into our product table if we use Eloquent to add records.
8. Update Code in Product Controller
In this step, we will update our Product Resource Controller which have sever (7) methods in it to perform CRUD operations in our Laravel 10 application.
By default, the following methods will be in our resource controller.
- index() -> To list all of our products.
- create() -> To display a create new product form.
- store() -> To store our new product form data into database.
- show() -> To display a single product with details.
- edit() -> To display the product edit form.
- update() -> To update the product data into database.
- destroy() -> To delete the product from database.
Just copy and paste the below code in app\Http\Controllers\ProductController.php file.
<?php

namespace App\Http\Controllers;

use App\Models\Product;
use Illuminate\View\View;
use Illuminate\Http\RedirectResponse;
use App\Http\Requests\StoreProductRequest;
use App\Http\Requests\UpdateProductRequest;

class ProductController extends Controller
{
    /**
     * Display a listing of the resource.
     */
    public function index() : View
    {
        return view('products.index', [
            'products' => Product::latest()->paginate(3)
        ]);
    }

    /**
     * Show the form for creating a new resource.
     */
    public function create() : View
    {
        return view('products.create');
    }

    /**
     * Store a newly created resource in storage.
     */
    public function store(StoreProductRequest $request) : RedirectResponse
    {
        Product::create($request->all());
        return redirect()->route('products.index')
                ->withSuccess('New product is added successfully.');
    }

    /**
     * Display the specified resource.
     */
    public function show(Product $product) : View
    {
        return view('products.show', [
            'product' => $product
        ]);
    }

    /**
     * Show the form for editing the specified resource.
     */
    public function edit(Product $product) : View
    {
        return view('products.edit', [
            'product' => $product
        ]);
    }

    /**
     * Update the specified resource in storage.
     */
    public function update(UpdateProductRequest $request, Product $product) : RedirectResponse
    {
        $product->update($request->all());
        return redirect()->back()
                ->withSuccess('Product is updated successfully.');
    }

    /**
     * Remove the specified resource from storage.
     */
    public function destroy(Product $product) : RedirectResponse
    {
        $product->delete();
        return redirect()->route('products.index')
                ->withSuccess('Product is deleted successfully.');
    }
}
Although the above code is self explanatory. However, I have added comments along with each method to mention the working of each method.
9. Update Code in Product Store and Update Requests
Now, we need to update code in our product store and update requests.
Copy paste the below code in app\Http\Requests\StoreProductRequest.php file.
<?php

namespace App\Http\Requests;

use Illuminate\Foundation\Http\FormRequest;

class StoreProductRequest extends FormRequest
{
    /**
     * Determine if the user is authorized to make this request.
     */
    public function authorize(): bool
    {
        return true;
    }

    /**
     * Get the validation rules that apply to the request.
     *
     * @return array<string, \Illuminate\Contracts\Validation\ValidationRule|array|string>
     */
    public function rules(): array
    {
        return [
            'code' => 'required|string|max:50|unique:products,code',
            'name' => 'required|string|max:250',
            'quantity' => 'required|integer|min:1|max:10000',
            'price' => 'required',
            'description' => 'nullable|string'
        ];
    }
}
And then copy paste the below code in app\Http\Requests\UpdateProductRequest.php file.
<?php

namespace App\Http\Requests;

use Illuminate\Foundation\Http\FormRequest;

class UpdateProductRequest extends FormRequest
{
    /**
     * Determine if the user is authorized to make this request.
     */
    public function authorize(): bool
    {
        return true;
    }

    /**
     * Get the validation rules that apply to the request.
     *
     * @return array<string, \Illuminate\Contracts\Validation\ValidationRule|array|string>
     */
    public function rules(): array
    {
        return [
            'code' => 'required|string|max:50|unique:products,code,'.$this->product->id,
            'name' => 'required|string|max:250',
            'quantity' => 'required|integer|min:1|max:10000',
            'price' => 'required',
            'description' => 'nullable|string'
        ];
    }
}
These both files are responsible to validate the data before adding/updating record in database.
Although, we can validate our data in our product controller as well but as per SOLID principle, it is a recommended to make a class for single responsibility principle.
So we want you to learn the right way of web development which is recommended by the industry.
10. Enable Bootstrap 5 in AppServiceProvider
As we are using Bootstrap v5.3, some of its feature will not work until you explicitly call it in App\Providers\AppServiceProviders.php file.
We need to add Paginator::useBootstrapFive(); in boot() method, just copy paste the below code in AppServiceProviders.php file.
<?php

namespace App\Providers;

use Illuminate\Support\ServiceProvider;
use Illuminate\Pagination\Paginator;

class AppServiceProvider extends ServiceProvider
{
    /**
     * Register any application services.
     */
    public function register(): void
    {
        //
    }

    /**
     * Bootstrap any application services.
     */
    public function boot(): void
    {
        Paginator::useBootstrapFive();
    }
}
11. Create Product Resource Blade View Files
Now we will create a products directory in resources/views/ directory and then create the following product resource blade view files in it.
- layouts.blade.php
- index.blade.php
- create.blade.php
- edit.blade.php
- show.blade.php
layouts.blade.php is an app main layout view file of Laravel 10 CRUD app, just copy and paste the below code in the file resources/views/products/layouts.blade.php
<!DOCTYPE html>
<html lang="{{ str_replace('_', '-', app()->getLocale()) }}">
<head>
    <meta charset="UTF-8">
    <meta name="viewport" content="width=device-width, initial-scale=1.0">
    <meta http-equiv="X-UA-Compatible" content="ie=edge">
    <title>Laravel 10 CRUD Application Tutorial - AllPHPTricks.com</title>
    <link href="https://cdn.jsdelivr.net/npm/[email protected]/dist/css/bootstrap.min.css" rel="stylesheet" integrity="sha384-4bw+/aepP/YC94hEpVNVgiZdgIC5+VKNBQNGCHeKRQN+PtmoHDEXuppvnDJzQIu9" crossorigin="anonymous">
    <link rel="stylesheet" href="https://cdn.jsdelivr.net/npm/[email protected]/font/bootstrap-icons.css">

</head>
<body>

    <div class="container">
        <h3 class=" mt-3">Laravel 10 CRUD Application Tutorial - <a href="https://www.allphptricks.com/">AllPHPTricks.com</a></h3>
            @yield('content')
            <div class="row justify-content-center text-center mt-3">
            <div class="col-md-12">
                <p>Back to Tutorial:
                    <a href="https://www.allphptricks.com/simple-laravel-10-crud-application/"><strong>Tutorial Link</strong></a>
                </p>
                <p>
                    For More Web Development Tutorials Visit: <a href="https://www.allphptricks.com/"><strong>AllPHPTricks.com</strong></a>
                </p>
            </div>
        </div>
    </div>

<script src="https://cdn.jsdelivr.net/npm/[email protected]/dist/js/bootstrap.bundle.min.js" integrity="sha384-HwwvtgBNo3bZJJLYd8oVXjrBZt8cqVSpeBNS5n7C8IVInixGAoxmnlMuBnhbgrkm" crossorigin="anonymous"></script>
</body>
</html>
index.blade.php is the Laravel 10 CRUD application main page which will list all products from database along with bootstrap v5.3 pagination, simply copy and paste the below code in the file resources/views/products/index.blade.php
@extends('products.layouts')

@section('content')

<div class="row justify-content-center mt-3">
    <div class="col-md-12">

        @if ($message = Session::get('success'))
            <div class="alert alert-success" role="alert">
                {{ $message }}
            </div>
        @endif

        <div class="card">
            <div class="card-header">Product List</div>
            <div class="card-body">
                <a href="{{ route('products.create') }}" class="btn btn-success btn-sm my-2"><i class="bi bi-plus-circle"></i> Add New Product</a>
                <table class="table table-striped table-bordered">
                    <thead>
                      <tr>
                        <th scope="col">S#</th>
                        <th scope="col">Code</th>
                        <th scope="col">Name</th>
                        <th scope="col">Quantity</th>
                        <th scope="col">Price</th>
                        <th scope="col">Action</th>
                      </tr>
                    </thead>
                    <tbody>
                        @forelse ($products as $product)
                        <tr>
                            <th scope="row">{{ $loop->iteration }}</th>
                            <td>{{ $product->code }}</td>
                            <td>{{ $product->name }}</td>
                            <td>{{ $product->quantity }}</td>
                            <td>{{ $product->price }}</td>
                            <td>
                                <form action="{{ route('products.destroy', $product->id) }}" method="post">
                                    @csrf
                                    @method('DELETE')

                                    <a href="{{ route('products.show', $product->id) }}" class="btn btn-warning btn-sm"><i class="bi bi-eye"></i> Show</a>

                                    <a href="{{ route('products.edit', $product->id) }}" class="btn btn-primary btn-sm"><i class="bi bi-pencil-square"></i> Edit</a>

                                    <button type="submit" class="btn btn-danger btn-sm" onclick="return confirm('Do you want to delete this product?');"><i class="bi bi-trash"></i> Delete</button>
                                </form>
                            </td>
                        </tr>
                        @empty
                            <td colspan="6">
                                <span class="text-danger">
                                    <strong>No Product Found!</strong>
                                </span>
                            </td>
                        @endforelse
                    </tbody>
                  </table>

                  {{ $products->links() }}

            </div>
        </div>
    </div>
</div>

@endsection
create.blade.php is the create/add new product view file, simply copy and paste the below code in the file resources/views/products/create.blade.php
@extends('products.layouts')
@section('content')
<div class="row justify-content-center mt-3">
<div class="col-md-8">
<div class="card">
<div class="card-header">
<div class="float-start">
Add New Product
</div>
<div class="float-end">
<a href="{{ route('products.index') }}" class="btn btn-primary btn-sm">← Back</a>
</div>
</div>
<div class="card-body">
<form action="{{ route('products.store') }}" method="post">
@csrf
<div class="mb-3 row">
<label for="code" class="col-md-4 col-form-label text-md-end text-start">Code</label>
<div class="col-md-6">
<input type="text" class="form-control @error('code') is-invalid @enderror" id="code" name="code" value="{{ old('code') }}">
@if ($errors->has('code'))
<span class="text-danger">{{ $errors->first('code') }}</span>
@endif
</div>
</div>
<div class="mb-3 row">
<label for="name" class="col-md-4 col-form-label text-md-end text-start">Name</label>
<div class="col-md-6">
<input type="text" class="form-control @error('name') is-invalid @enderror" id="name" name="name" value="{{ old('name') }}">
@if ($errors->has('name'))
<span class="text-danger">{{ $errors->first('name') }}</span>
@endif
</div>
</div>
<div class="mb-3 row">
<label for="quantity" class="col-md-4 col-form-label text-md-end text-start">Quantity</label>
<div class="col-md-6">
<input type="number" class="form-control @error('quantity') is-invalid @enderror" id="quantity" name="quantity" value="{{ old('quantity') }}">
@if ($errors->has('quantity'))
<span class="text-danger">{{ $errors->first('quantity') }}</span>
@endif
</div>
</div>
<div class="mb-3 row">
<label for="price" class="col-md-4 col-form-label text-md-end text-start">Price</label>
<div class="col-md-6">
<input type="number" step="0.01" class="form-control @error('price') is-invalid @enderror" id="price" name="price" value="{{ old('price') }}">
@if ($errors->has('price'))
<span class="text-danger">{{ $errors->first('price') }}</span>
@endif
</div>
</div>
<div class="mb-3 row">
<label for="description" class="col-md-4 col-form-label text-md-end text-start">Description</label>
<div class="col-md-6">
<textarea class="form-control @error('description') is-invalid @enderror" id="description" name="description">{{ old('description') }}</textarea>
@if ($errors->has('description'))
<span class="text-danger">{{ $errors->first('description') }}</span>
@endif
</div>
</div>
<div class="mb-3 row">
<input type="submit" class="col-md-3 offset-md-5 btn btn-primary" value="Add Product">
</div>
</form>
</div>
</div>
</div>
</div>
@endsectionedit.blade.php is a edit product view file, simply copy and paste the below code in the file resources/views/products/edit.blade.php
@extends('products.layouts')
@section('content')
<div class="row justify-content-center mt-3">
<div class="col-md-8">
@if ($message = Session::get('success'))
<div class="alert alert-success" role="alert">
{{ $message }}
</div>
@endif
<div class="card">
<div class="card-header">
<div class="float-start">
Edit Product
</div>
<div class="float-end">
<a href="{{ route('products.index') }}" class="btn btn-primary btn-sm">← Back</a>
</div>
</div>
<div class="card-body">
<form action="{{ route('products.update', $product->id) }}" method="post">
@csrf
@method("PUT")
<div class="mb-3 row">
<label for="code" class="col-md-4 col-form-label text-md-end text-start">Code</label>
<div class="col-md-6">
<input type="text" class="form-control @error('code') is-invalid @enderror" id="code" name="code" value="{{ $product->code }}">
@if ($errors->has('code'))
<span class="text-danger">{{ $errors->first('code') }}</span>
@endif
</div>
</div>
<div class="mb-3 row">
<label for="name" class="col-md-4 col-form-label text-md-end text-start">Name</label>
<div class="col-md-6">
<input type="text" class="form-control @error('name') is-invalid @enderror" id="name" name="name" value="{{ $product->name }}">
@if ($errors->has('name'))
<span class="text-danger">{{ $errors->first('name') }}</span>
@endif
</div>
</div>
<div class="mb-3 row">
<label for="quantity" class="col-md-4 col-form-label text-md-end text-start">Quantity</label>
<div class="col-md-6">
<input type="number" class="form-control @error('quantity') is-invalid @enderror" id="quantity" name="quantity" value="{{ $product->quantity }}">
@if ($errors->has('quantity'))
<span class="text-danger">{{ $errors->first('quantity') }}</span>
@endif
</div>
</div>
<div class="mb-3 row">
<label for="price" class="col-md-4 col-form-label text-md-end text-start">Price</label>
<div class="col-md-6">
<input type="number" step="0.01" class="form-control @error('price') is-invalid @enderror" id="price" name="price" value="{{ $product->price }}">
@if ($errors->has('price'))
<span class="text-danger">{{ $errors->first('price') }}</span>
@endif
</div>
</div>
<div class="mb-3 row">
<label for="description" class="col-md-4 col-form-label text-md-end text-start">Description</label>
<div class="col-md-6">
<textarea class="form-control @error('description') is-invalid @enderror" id="description" name="description">{{ $product->description }}</textarea>
@if ($errors->has('description'))
<span class="text-danger">{{ $errors->first('description') }}</span>
@endif
</div>
</div>
<div class="mb-3 row">
<input type="submit" class="col-md-3 offset-md-5 btn btn-primary" value="Update">
</div>
</form>
</div>
</div>
</div>
</div>
@endsectionshow.blade.php is a single product view file, just copy and paste the below code in the file resources/views/products/show.blade.php
@extends('products.layouts')
@section('content')
<div class="row justify-content-center mt-3">
<div class="col-md-8">
<div class="card">
<div class="card-header">
<div class="float-start">
Product Information
</div>
<div class="float-end">
<a href="{{ route('products.index') }}" class="btn btn-primary btn-sm">← Back</a>
</div>
</div>
<div class="card-body">
<div class="row">
<label for="code" class="col-md-4 col-form-label text-md-end text-start"><strong>Code:</strong></label>
<div class="col-md-6" style="line-height: 35px;">
{{ $product->code }}
</div>
</div>
<div class="row">
<label for="name" class="col-md-4 col-form-label text-md-end text-start"><strong>Name:</strong></label>
<div class="col-md-6" style="line-height: 35px;">
{{ $product->name }}
</div>
</div>
<div class="row">
<label for="quantity" class="col-md-4 col-form-label text-md-end text-start"><strong>Quantity:</strong></label>
<div class="col-md-6" style="line-height: 35px;">
{{ $product->quantity }}
</div>
</div>
<div class="row">
<label for="price" class="col-md-4 col-form-label text-md-end text-start"><strong>Price:</strong></label>
<div class="col-md-6" style="line-height: 35px;">
{{ $product->price }}
</div>
</div>
<div class="row">
<label for="description" class="col-md-4 col-form-label text-md-end text-start"><strong>Description:</strong></label>
<div class="col-md-6" style="line-height: 35px;">
{{ $product->description }}
</div>
</div>
</div>
</div>
</div>
</div>
@endsection12. Run Laravel Development Server
So now we have finally completed our Laravel 10 CRUD application, it is the time to test the application. Just run the Laravel development server by running the command below.
php artisan serveAfter that open the application on the browser by visiting the below link to test our Laravel CRUD application.
http://127.0.0.1:8000/productsConclusion
I hope now you have learnt how to easily create a simple Laravel 10 CRUD application by following the above simple mentioned steps.
If you found this tutorial helpful, share it with your friends and developers group.
I spent several hours to create this tutorial, if you want to say thanks so like my page on Facebook, Twitter and share it.
Facebook Official Page: All PHP Tricks
Twitter Official Page: All PHP Tricks


Como fazer para achar a pasta env?
Dear Julia, it is available on the root or you can create one, when you install Laravel, it will come with it.
I must be missing something. I can read from the DB no problem. When I try to edit or create new records it just reloads the content and no changes. Any thououghts on this?
You should debug it using dd() method in your controller.
Thank you so much
Dear John,
Glad to know that you find Laravel 10 CRUD tutorial helpful.
Dear Mr Javed Ur Rehman, your tutorial is very helpful! But can i know how to combine both project? For example, when i try to combine login registration and crud application according to your tutorial, i always get an error.
Dear Aidil,
I am happy that you like my tutorial, you can combine both tutorials if you are properly adding all the required things such as controllers, views, model etc.
If you can share your error then I can let you know what may be the reason of error.
Very nice,This is very clean,this one of the best resource,this very usefull.thanks a lot.
Dear Md Robiul Islam,
I am glad that you found my tutorial helpful.
Thank you very much.
Mr. Javed Ur Rehman
شکرا
Thanks I am glad that you find my tutorial helpful.