
Laravel 10 Livewire CRUD Application Tutorial

In this tutorial, we will learn about Laravel 10 Livewire CRUD operations by developing a complete Laravel 10 Livewire CRUD application with simple and step by step guide.
In this example, we will use the Laravel 10, Livewire 3.4 with the Bootstrap 5.3 version.
If you are building application on Laravel then you do not need to use any front end framework such as React, Angular or Vue.js because Livewire is here to do all stuff that are done by using React, Angular or Vue.js.
Before start developing the Laravel Livewire CRUD application, lets learn what is Livewire and CRUD application.
What is Livewire?
Livewire is a full-stack framework that works on Laravel framework. It helps to build dynamic user interfaces easily, you can update user interfaces without leaving the comfort of Laravel.
In simple words, Livewire perform all AJAX operations and avoid page refresh without writing JavaScript code. Isn’t that sound great?
What is CRUD?
In computer programming, Create, Read, Update, and Delete (CRUD) are basic and main four operations of permanent storage which is our database.
Whenever, we build any application it performs all these four operations to make application functional.
Create: You will always create new records in your application.
Read: Display records from database to user screen.
Update: Update any existing record information in database.
Delete: Delete any records from the database.
Readers Also Read: Laravel 10 CRUD Application
Application Flow:
In this tutorial, we will create a simple products table in our Laravel 10 Livewire application and perform CRUD operations on it.
Product table will store product information such as product name and product description.
We will add new product records, view all products records, update some products and also delete some products from database. This is our complete CRUD operations in Laravel using Livewire.
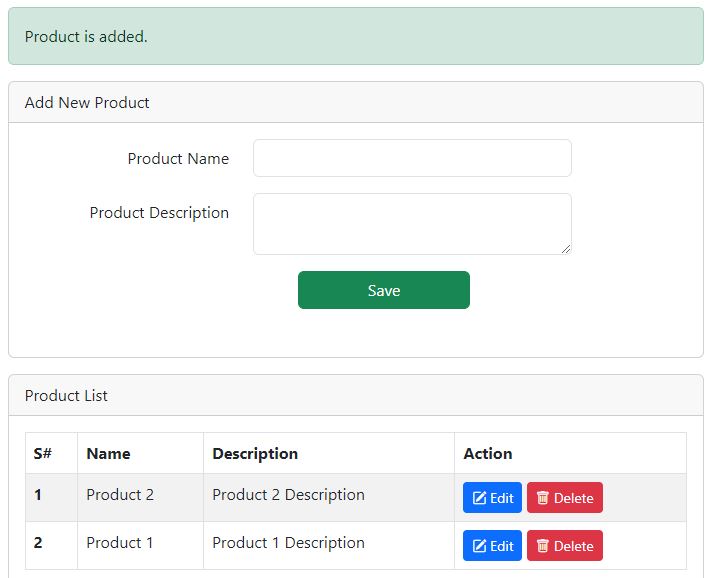
Following is the screenshot of the Laravel 10 Livewire CRUD application with the example of products table.
So without further delay, lets start developing a simple Laravel 10 Livewire CRUD application with products example.
Steps to Create Laravel 10 Livewire CRUD Application
Follow the below simple steps to create a Laravel Livewire CRUD application.
- Install Laravel 10 App
- Configure Database Credentials
- Create and Update Product Model with Migration
- Migrate Tables to Database
- Install Laravel Livewire in Our Application
- Create Livewire Layout
- Create Livewire Product Component Class and Blade View Files
- Define Application Product Route
- Run Laravel Development Server
1. Install Laravel 10 App
Open the terminal window/command prompt and go to the directory where you want to install Laravel 10 Livewire CRUD application. For example like below.
cd desktop\workspaceNow install the Laravel 10 application with name laravel_10_livewire_crud by running the below command on your terminal window/command prompt.
composer create-project --prefer-dist laravel/laravel:^10 laravel_10_livewire_crudAfter installing Laravel, move to the newly created directly by running the below command.
cd laravel_10_livewire_crud2. Configure Database Credentials
In the 2nd step, we need to configure database credentials for Laravel Livewire CRUD app. Just update the .env file which is available on the application root directory.
Just open the .env file and enter your own database credentials details.
Database Credentials:
DB_CONNECTION=mysql
DB_HOST=127.0.0.1
DB_PORT=3306
DB_DATABASE=your_db_name
DB_USERNAME=your_db_username
DB_PASSWORD=your_db_password
3. Create and Update Product Model with Migration
Now, we need to create a product Model and Migration. Just run the below command to create model and migration of product.
php artisan make:model Product -mIn the above command –m flag is to create a migration of the product Model.
Now we need to update product migration file, simply go to the directory laravel_10_livewire_crud\database\migrations and there you will see a product migration file like below.
YYYY_MM_DD_TIMESTAMP_create_products_table.php
Simply open this migration file and paste the following code in it.
<?php

use Illuminate\Database\Migrations\Migration;
use Illuminate\Database\Schema\Blueprint;
use Illuminate\Support\Facades\Schema;

return new class extends Migration
{
    /**
     * Run the migrations.
     */
    public function up(): void
    {
        Schema::create('products', function (Blueprint $table) {
            $table->id();
            $table->string('name');
            $table->text('description');
            $table->timestamps();
        });
    }

    /**
     * Reverse the migrations.
     */
    public function down(): void
    {
        Schema::dropIfExists('products');
    }
};
Now we will also update the product model file, simply go to the app\Models\Product.php and update the following code in Product.php file.
<?php

namespace App\Models;

use Illuminate\Database\Eloquent\Factories\HasFactory;
use Illuminate\Database\Eloquent\Model;

class Product extends Model
{
    use HasFactory;

    protected $fillable = [
        'name',
        'description'
    ];
}
4. Migrate Tables to Database
We have created and updated the product migration, now we need to migrate tables into our database.
Run the below command to migrate all tables into database.
php artisan migrate5. Install Laravel Livewire in our Application
In this step, we will install Livewire in our Laravel application by running the below command.
composer require livewire/livewire6. Create Livewire Layout
After installing Livewire, we will need to create a Livewire layout. Just run the below command in your terminal and it will create the Livewire layout in \resources\views\components\layouts\app.blade.php
php artisan livewire:layoutNow open this layout file app.blade.php and update the following code in it.
<!DOCTYPE html>
<html lang="{{ str_replace('_', '-', app()->getLocale()) }}">
    <head>
        <meta charset="utf-8">
        <meta name="viewport" content="width=device-width, initial-scale=1.0">

        <title>{{ $title ?? 'Laravel 10 Livewire CRUD Application Tutorial - AllPHPTricks.com' }}</title>
        <link href="https://cdn.jsdelivr.net/npm/[email protected]/dist/css/bootstrap.min.css" rel="stylesheet" integrity="sha384-4bw+/aepP/YC94hEpVNVgiZdgIC5+VKNBQNGCHeKRQN+PtmoHDEXuppvnDJzQIu9" crossorigin="anonymous">
    <link rel="stylesheet" href="https://cdn.jsdelivr.net/npm/[email protected]/font/bootstrap-icons.css">
    </head>
    <body>
        <div class="container">
            <h3 class="mt-3">Laravel 10 Livewire CRUD Application Tutorial - <a href="https://www.allphptricks.com/">AllPHPTricks.com</a></h3>

            {{ $slot }}

        </div>

        <script src="https://cdn.jsdelivr.net/npm/[email protected]/dist/js/bootstrap.bundle.min.js" integrity="sha384-HwwvtgBNo3bZJJLYd8oVXjrBZt8cqVSpeBNS5n7C8IVInixGAoxmnlMuBnhbgrkm" crossorigin="anonymous"></script>
    </body>
</html>
7. Create Livewire Product Component Class and Blade View Files
Now, we need to create a Livewire product component class and blade view files. Just run the below command in terminal.
php artisan make:livewire productsThe above command will create two files, a Livewire component class and livewire blade view files on the following locations:
app/Livewire/Products.php

resources/views/livewire/products.blade.php
Product component file will work like our controller, we will write all functions of our application in this file. Such as save(), render(), edit(), delete(), cancel(), and resetFields().
Now open the Livewire product component file app/Livewire/Products.php and paste the following code in it.
<?php

namespace App\Livewire;

use Livewire\Attributes\Locked;
use Livewire\Attributes\Validate;
use Livewire\Component;
use App\Models\Product;

class Products extends Component
{
    public $products;

    #[Locked]
    public $product_id;

    #[Validate('required')]
    public $name = '';

    #[Validate('required')]
    public $description = '';

    public $isEdit = false;

    public $title = 'Add New Product';

    public function resetFields()
    {
        $this->title = 'Add New Product';

        $this->reset('name', 'description');

        $this->isEdit = false;
    }

    public function save()
    {
        $this->validate();

        Product::updateOrCreate(['id' => $this->product_id], [
            'name' => $this->name,
            'description' => $this->description,
        ]);

        session()->flash('message', $this->product_id ? 'Product is updated.' : 'Product is added.');

        $this->resetFields();
    }

    public function edit($id)
    {
        $this->title = 'Edit Product';

        $product = Product::findOrFail($id);

        $this->product_id = $id;

        $this->name = $product->name;

        $this->description = $product->description;

        $this->isEdit = true;
    }

    public function cancel()
    {
        $this->resetFields();
    }

    public function delete($id)
    {
        Product::find($id)->delete();

        session()->flash('message', 'Product is deleted.');
    }

    public function render()
    {
        $this->products = Product::latest()->get();

        return view('livewire.products');
    }
}
Now open products blade view file resources/views/livewire/products.blade.php and update the following code in it.
<div class="row justify-content-center mt-3">
    <div class="col-md-12">

        @if (session()->has('message'))
            <div class="alert alert-success" role="alert">
                {{ session('message') }}
            </div>
        @endif

        @include('livewire.updateOrCreate')


        <div class="row justify-content-center text-center mt-3">
            <div class="col-md-12">
                <p>Back to Tutorial:
                    <a href="https://www.allphptricks.com/laravel-10-livewire-crud-application-tutorial/"><strong>Tutorial Link</strong></a>
                </p>
                <p>
                    For More Web Development Tutorials Visit: <a href="https://www.allphptricks.com/"><strong>AllPHPTricks.com</strong></a>
                </p>
            </div>
        </div>

        <div class="card">
            <div class="card-header">Product List</div>
            <div class="card-body">
                <table class="table table-striped table-bordered">
                    <thead>
                      <tr>
                        <th scope="col">S#</th>
                        <th scope="col">Name</th>
                        <th scope="col">Description</th>
                        <th scope="col">Action</th>
                      </tr>
                    </thead>
                    <tbody>
                        @forelse ($products as $product)
                            <tr wire:key="{{ $product->id }}">
                                <th scope="row">{{ $loop->iteration }}</th>
                                <td>{{ $product->name }}</td>
                                <td>{{ $product->description }}</td>
                                <td>
                                    <button wire:click="edit({{ $product->id }})"
                                        class="btn btn-primary btn-sm">
                                        <i class="bi bi-pencil-square"></i> Edit
                                    </button>

                                    <button wire:click="delete({{ $product->id }})"
                                        wire:confirm="Are you sure you want to delete this product?"
                                        class="btn btn-danger btn-sm">
                                        <i class="bi bi-trash"></i> Delete
                                    </button>
                                </td>
                            </tr>
                        @empty
                            <tr>
                                <td colspan="4">
                                    <span class="text-danger">
                                        <strong>No Product Found!</strong>
                                    </span>
                                </td>
                            </tr>
                        @endforelse
                    </tbody>
                </table>
            </div>
        </div>
    </div>
</div>
Create another blade view file in /resources/views/livewire/ with named updateOrCreate.blade.php and paste the following code in it.
/resources/views/livewire/updateOrCreate.blade.php
<div class="row justify-content-center mt-3 mb-3">
    <div class="col-md-12">

        <div class="card">
            <div class="card-header">
                <div class="float-start">
                    {{ $title }}
                </div>
            </div>
            <div class="card-body">
                <form wire:submit="save">

                    <div class="mb-3 row">
                        <label for="name" class="col-md-4 col-form-label text-md-end text-start">Product Name</label>
                        <div class="col-md-6">
                          <input type="text" class="form-control @error('name') is-invalid @enderror" id="name" wire:model="name">
                            @if ($errors->has('name'))
                                <span class="text-danger">{{ $errors->first('name') }}</span>
                            @endif
                        </div>
                    </div>

                    <div class="mb-3 row">
                        <label for="description" class="col-md-4 col-form-label text-md-end text-start">Product Description</label>
                        <div class="col-md-6">
                            <textarea class="form-control @error('description') is-invalid @enderror" id="description" wire:model="description"></textarea>
                            @if ($errors->has('description'))
                                <span class="text-danger">{{ $errors->first('description') }}</span>
                            @endif
                        </div>
                    </div>

                    <div class="mb-3 row">
                        <button type="submit" class="col-md-3 offset-md-5 btn btn-success">
                             Save
                        </button>
                    </div>

                    @if($isEdit)
                        <div class="mb-3 row">
                            <button wire:click="cancel"
                                class="col-md-3 offset-md-5 btn btn-danger">
                                Cancel
                            </button>
                        </div>
                    @endif

                    <div class="mb-3 row">
                        <span wire:loading class="col-md-3 offset-md-5 text-primary">Processing...</span>
                    </div>

                </form>
            </div>
        </div>
    </div>
</div>
8. Define Application Product Route
In this step, we need to define our product component route in web.php. just copy and paste the below code in your routes/web.php file.
<?php

use Illuminate\Support\Facades\Route;
use App\Livewire\Products;

/*
|--------------------------------------------------------------------------
| Web Routes
|--------------------------------------------------------------------------
|
| Here is where you can register web routes for your application. These
| routes are loaded by the RouteServiceProvider and all of them will
| be assigned to the "web" middleware group. Make something great!
|
*/

Route::get('/', function () {
    return view('welcome');
});

Route::get('/products', Products::class);
9. Run Laravel Development Server
In this final step, we will run the Laravel development server and test our application. We have finally completed our Laravel 10 Livewire CRUD application.
Just run the below command to start Laravel development server.
php artisan serveAfter running application server now open the web browser and enter the below link to test our Laravel 10 Livewire CRUD application.
http://127.0.0.1:8000/productsConclusion
We hope by now you have learnt how to create a simple Laravel 10 Livewire CRUD application by following the above simple mentioned steps.
If you found this tutorial helpful, share it with your friends and developers group.
I spent several hours to create this tutorial, if you want to say thanks so like my page on Facebook, Twitter and share it.
Facebook Official Page: All PHP Tricks
Twitter Official Page: All PHP Tricks


Hi, Congrats for this job. Very useful!
I’m trying to apply this tutorial on a shared server use for testing, but
I see some errors in js console coming from livewire when working on a subfolder (domain.com/myapp) -> livewire/ipdate not found 404, something like this…
When working on localhost o in main folder, all seems to works, instead.
Have ever heard about this kind of issue?
Thanks for paying attention, hope you’re gonna answser
May be this will solve your issue. https://github.com/livewire/livewire/discussions/7915
Thanks for sharing such a useful article about Laravel Livewire. It helped me a lot.
Dear Harsh,
I am glad to know that you found it helpful.
Thank you very much friend. Many thanks for this code.
Dear Sayad,
I am glad that you found it helpful.
Thank you for sharing your knowledge with us!
Dear Armand,
I am glad that you find this tutorial helpful.
Nice sir
Dear Chetan, glad to know that you found it helpful.