
Laravel 10 REST API using Sanctum Authentication
In this tutorial, we will learn about Laravel 10 REST API using Sanctum authentication by developing a complete Laravel REST API authentication with Sanctum application with simple and step by step guide.
We will build this Laravel 10 Sanctum API authentication in the easiest way so that even those, who are building API for the first time can easily build Laravel 10 Sanctum SPA API.
Previously, we have shared how to create and consume simple REST API in PHP. This can help you to understand the process of building the simplest APIs in PHP.
What is API?
An API (application programming interface) is simply just a way communication between two or more computer programs.
APIs are also used for web and mobile applications development, therefore building REST API is very essential for any web and mobile application developer.
What is Laravel Sanctum?
We will use Laravel Sanctum, an authentication system package for developing simple APIs for SPAs (single page applications) which are commonly build via React JS, Angular or Vue JS.
Laravel Sanctum enable us to generate multiple access tokens for registered users, which help us to access protected routes and end points.
It is very essential to learn about Laravel Sanctum to build Laravel RESTful protected APIs.
For this example, we will use the Laravel 10.10 and Sanctum 3.3 versions.
Although, there is another way to develop Laravel 10 REST API using Passport authentication but in this tutorial, we will use Laravel Sanctum.
Laravel Sanctum package makes it easy to generate a personal access token for the protected or authenticated routes/end points which are stored in table personal_access_tokens.
We are mainly using Laravel Sanctum only for the protected routes or end points.
For the public routes, we do not need to use the personal access token.
Application Flow
In this example, we will create a new products table which will save all products data and there are two columns in product table which are name and description.
We will build APIs for Laravel custom user registration and login which will also generate a personal access token via Laravel Sanctum. We will also develop API for user logout as well.
User registration and login are public routes, so that these routes can return the access token for protected routes. However, logout route is a protected route, user will need to provide correct access token to logout from the app.
To test our protected routes, we will use tokens to create, update and delete product. Therefore, we will also build API for our products CRUD operations.
To view all products, single product and search products, we will not use token as these are public routes and anyone with the endpoints can access these routes.
If you do not have any idea about how to develop a Laravel CRUD application, then you can checkout our tutorial about Laravel 10 CRUD application.
So now without further delay, lets start developing a simple Laravel 10 REST API authentication application with Sanctum package example.
Steps to Create Laravel 10 REST API using Sanctum Authentication
Follow the below easy and simple step by step guide to create a Laravel 10 REST API using Sanctum authentication example application.
- Install Laravel 10 App
- Install Laravel Sanctum Package
- Enable Sanctum Middleware in Kernel.php
- Add HasApiTokens in User Model
- Create and Update LoginRegister Controller
- Create and Update Product Model with Migration and API Resource Controller
- Define API Endpoints in routes/api.php
- Configure Database Credentials
- Migrate Tables to Database
- Run Laravel Development Server & Test the Application
1. Install Laravel 10 App
Install the Laravel 10 app with name laravel-10-sanctum-api by running the below command on your terminal window or command prompt.
composer create-project --prefer-dist laravel/laravel:^10 laravel-10-sanctum-apiAnd then go to the laravel-10-sanctum-api directory by running the below command.
cd laravel-10-sanctum-api2. Install Laravel Sanctum Package
Although, Laravel Sanctum is already available in Laravel v10, in case if your Laravel version does not have it, you can install it.
You can check in your composer.json file in “require”: section, if Sanctum is already available then you will see something like that “laravel/sanctum”: “^3.3”.
Otherwise, install the Laravel Sanctum package by running the below command using composer.
composer require laravel/sanctumAfter installation of the package, we will need to publish the package using the below command.
php artisan vendor:publish --provider="Laravel\Sanctum\SanctumServiceProvider"If Sanctum is already available in your Laravel version, then you do not need to publish it.
3. Enable Sanctum Middleware in Kernel.php
Now we need to enable Sanctum middleware, just go to the \app\Http\Kernel.php and update the following code in ‘api’ section.
'api' => [
            \Laravel\Sanctum\Http\Middleware\EnsureFrontendRequestsAreStateful::class,
            \Illuminate\Routing\Middleware\ThrottleRequests::class.':api',
            \Illuminate\Routing\Middleware\SubstituteBindings::class,
        ],
4. Add HasApiTokens in User Model
HasApiTokens is also already available in Laravel v10, you do not need to do anything, if it is already available in your user model.
Otherwise, go to the user model and update following code in \app\Models\User.php
<?php

namespace App\Models;

// use Illuminate\Contracts\Auth\MustVerifyEmail;
use Illuminate\Database\Eloquent\Factories\HasFactory;
use Illuminate\Foundation\Auth\User as Authenticatable;
use Illuminate\Notifications\Notifiable;
use Laravel\Sanctum\HasApiTokens;

class User extends Authenticatable
{
    use HasApiTokens, HasFactory, Notifiable;

    /**
     * The attributes that are mass assignable.
     *
     * @var array<int, string>
     */
    protected $fillable = [
        'name',
        'email',
        'password',
    ];

    /**
     * The attributes that should be hidden for serialization.
     *
     * @var array<int, string>
     */
    protected $hidden = [
        'password',
        'remember_token',
    ];

    /**
     * The attributes that should be cast.
     *
     * @var array<string, string>
     */
    protected $casts = [
        'email_verified_at' => 'datetime',
        'password' => 'hashed',
    ];
}
5. Create and Update LoginRegister Controller
Now, we need to create Login and Register Controller. Just run the below command in your terminal.
php artisan make:controller Auth\LoginRegisterControllerNow, go to the \Http\Controllers\Auth\LoginRegisterController.php and update the following code in it.
<?php

namespace App\Http\Controllers\Auth;

use App\Models\User;
use Illuminate\Http\Request;
use App\Http\Controllers\Controller;
use Illuminate\Support\Facades\Hash;
use Validator;

class LoginRegisterController extends Controller
{
     /**
     * Register a new user.
     *
     * @param  \Illuminate\Http\Request  $request
     * @return \Illuminate\Http\Response
     */
    public function register(Request $request)
    {
        $validate = Validator::make($request->all(), [
            'name' => 'required|string|max:250',
            'email' => 'required|string|email:rfc,dns|max:250|unique:users,email',
            'password' => 'required|string|min:8|confirmed'
        ]);

        if($validate->fails()){
            return response()->json([
                'status' => 'failed',
                'message' => 'Validation Error!',
                'data' => $validate->errors(),
            ], 403);
        }

        $user = User::create([
            'name' => $request->name,
            'email' => $request->email,
            'password' => Hash::make($request->password)
        ]);

        $data['token'] = $user->createToken($request->email)->plainTextToken;
        $data['user'] = $user;

        $response = [
            'status' => 'success',
            'message' => 'User is created successfully.',
            'data' => $data,
        ];

        return response()->json($response, 201);
    }

    /**
     * Authenticate the user.
     *
     * @param  \Illuminate\Http\Request  $request
     * @return \Illuminate\Http\Response
     */
    public function login(Request $request)
    {
        $validate = Validator::make($request->all(), [
            'email' => 'required|string|email',
            'password' => 'required|string'
        ]);

        if($validate->fails()){
            return response()->json([
                'status' => 'failed',
                'message' => 'Validation Error!',
                'data' => $validate->errors(),
            ], 403);
        }

        // Check email exist
        $user = User::where('email', $request->email)->first();

        // Check password
        if(!$user || !Hash::check($request->password, $user->password)) {
            return response()->json([
                'status' => 'failed',
                'message' => 'Invalid credentials'
                ], 401);
        }

        $data['token'] = $user->createToken($request->email)->plainTextToken;
        $data['user'] = $user;

        $response = [
            'status' => 'success',
            'message' => 'User is logged in successfully.',
            'data' => $data,
        ];

        return response()->json($response, 200);
    }

    /**
     * Log out the user from application.
     *
     * @param  \Illuminate\Http\Request  $request
     * @return \Illuminate\Http\Response
     */
    public function logout(Request $request)
    {
        auth()->user()->tokens()->delete();
        return response()->json([
            'status' => 'success',
            'message' => 'User is logged out successfully'
            ], 200);
    }
}
Readers Also Read: Laravel 10 User Roles and Permissions
6. Create and Update Product Model with Migration and API Resource Controller
Now, we need to create product model, migration and API resource controller, we can create them individually, but we like the power of artisan which can help us to create them together.
Just run the below command in your terminal.
php artisan make:model Product -mcr --apiNow, go to \database\migrations directory and locate your product migration file with name like YYYY_MM_DD_TIMESTAMP_create_products_table.php, open it and update the following code in it.
<?php

use Illuminate\Database\Migrations\Migration;
use Illuminate\Database\Schema\Blueprint;
use Illuminate\Support\Facades\Schema;

return new class extends Migration
{
    /**
     * Run the migrations.
     */
    public function up(): void
    {
        Schema::create('products', function (Blueprint $table) {
            $table->id();
            $table->string('name');
            $table->text('description');
            $table->timestamps();
        });
    }

    /**
     * Reverse the migrations.
     */
    public function down(): void
    {
        Schema::dropIfExists('products');
    }
};
Now, go to the \app\Models\Product.php and update code in your product model with the following code.
<?php

namespace App\Models;

use Illuminate\Database\Eloquent\Factories\HasFactory;
use Illuminate\Database\Eloquent\Model;

class Product extends Model
{
    use HasFactory;

    protected $fillable = [
        'name',
        'description'
    ];
}
And finally go to the \app\Http\Controllers and update the following code in ProductController.php
<?php

namespace App\Http\Controllers;

use App\Models\Product;
use Illuminate\Http\Request;
use Validator;


class ProductController extends Controller
{
    /**
     * Display a listing of the resource.
     *
     * @return \Illuminate\Http\Response
     */
    public function index()
    {
        $products = Product::latest()->get();

        if (is_null($products->first())) {
            return response()->json([
                'status' => 'failed',
                'message' => 'No product found!',
            ], 200);
        }

        $response = [
            'status' => 'success',
            'message' => 'Products are retrieved successfully.',
            'data' => $products,
        ];

        return response()->json($response, 200);
    }

    /**
     * Store a newly created resource in storage.
     */
    public function store(Request $request)
    {
        $validate = Validator::make($request->all(), [
            'name' => 'required|string|max:250',
            'description' => 'required|string|'
        ]);

        if($validate->fails()){
            return response()->json([
                'status' => 'failed',
                'message' => 'Validation Error!',
                'data' => $validate->errors(),
            ], 403);
        }

        $product = Product::create($request->all());

        $response = [
            'status' => 'success',
            'message' => 'Product is added successfully.',
            'data' => $product,
        ];

        return response()->json($response, 200);
    }

    /**
     * Display the specified resource.
     */
    public function show($id)
    {
        $product = Product::find($id);

        if (is_null($product)) {
            return response()->json([
                'status' => 'failed',
                'message' => 'Product is not found!',
            ], 200);
        }

        $response = [
            'status' => 'success',
            'message' => 'Product is retrieved successfully.',
            'data' => $product,
        ];

        return response()->json($response, 200);
    }

    /**
     * Update the specified resource in storage.
     */
    public function update(Request $request, $id)
    {
        $validate = Validator::make($request->all(), [
            'name' => 'required',
            'description' => 'required'
        ]);

        if($validate->fails()){
            return response()->json([
                'status' => 'failed',
                'message' => 'Validation Error!',
                'data' => $validate->errors(),
            ], 403);
        }

        $product = Product::find($id);

        if (is_null($product)) {
            return response()->json([
                'status' => 'failed',
                'message' => 'Product is not found!',
            ], 200);
        }

        $product->update($request->all());

        $response = [
            'status' => 'success',
            'message' => 'Product is updated successfully.',
            'data' => $product,
        ];

        return response()->json($response, 200);
    }

    /**
     * Remove the specified resource from storage.
     */
    public function destroy($id)
    {
        $product = Product::find($id);

        if (is_null($product)) {
            return response()->json([
                'status' => 'failed',
                'message' => 'Product is not found!',
            ], 200);
        }

        Product::destroy($id);
        return response()->json([
            'status' => 'success',
            'message' => 'Product is deleted successfully.'
            ], 200);
    }

    /**
     * Search by a product name
     *
     * @param  str  $name
     * @return \Illuminate\Http\Response
     */
    public function search($name)
    {
        $products = Product::where('name', 'like', '%'.$name.'%')
            ->latest()->get();

        if (is_null($products->first())) {
            return response()->json([
                'status' => 'failed',
                'message' => 'No product found!',
            ], 200);
        }

        $response = [
            'status' => 'success',
            'message' => 'Products are retrieved successfully.',
            'data' => $products,
        ];

        return response()->json($response, 200);
    }
}
7. Define API Endpoints in routes/api.php
Now, we need to define the API routes / endpoints for the user registration, login, log out, and product CRUD routes along with search products.
Just copy and paste the below code in \routes\api.php
<?php

use Illuminate\Http\Request;
use Illuminate\Support\Facades\Route;
use App\Http\Controllers\ProductController;
use App\Http\Controllers\Auth\LoginRegisterController;

/*
|--------------------------------------------------------------------------
| API Routes
|--------------------------------------------------------------------------
|
| Here is where you can register API routes for your application. These
| routes are loaded by the RouteServiceProvider and all of them will
| be assigned to the "api" middleware group. Make something great!
|
*/

// Public routes of authtication
Route::controller(LoginRegisterController::class)->group(function() {
    Route::post('/register', 'register');
    Route::post('/login', 'login');
});

// Public routes of product
Route::controller(ProductController::class)->group(function() {
    Route::get('/products', 'index');
    Route::get('/products/{id}', 'show');
    Route::get('/products/search/{name}', 'search');
});

// Protected routes of product and logout
Route::middleware('auth:sanctum')->group( function () {
    Route::post('/logout', [LoginRegisterController::class, 'logout']);

    Route::controller(ProductController::class)->group(function() {
        Route::post('/products', 'store');
        Route::post('/products/{id}', 'update');
        Route::delete('/products/{id}', 'destroy');
    });
});
8. Configure Database Credentials
In this step, we need to update the database credentials such as database name, username and password. Just update the .env file which is located on the root directory of your application.
Open the .env file and update it with your own database credentials.
Database Credentials:
DB_CONNECTION=mysql
DB_HOST=127.0.0.1
DB_PORT=3306
DB_DATABASE=your_db_name
DB_USERNAME=your_db_username
DB_PASSWORD=your_db_password
9. Migrate Tables to Database
Now run the below command on your terminal or command prompt to migrate all migrations tables in your database including products tables.
php artisan migrate10. Run Laravel Development Server & Test the Application
Now, it is the time to run the development server and test the Laravel 10 REST APIs which are build using Sanctum authentication. Just run the Laravel development server by running the below command.
php artisan serveOnce the server starts running, open the Postman application to test APIs, if you do not have Postman then you will need to install Postman into your machine and create account on Postman website.
You will need to login to your Postman application. You can easily find tutorial on the internet on how to install Postman.
Now on the top left of your Postman application, there is a New button to create new API request. Just click on New button -> then select HTTP.
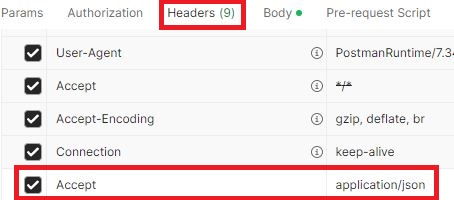
Make sure that you add the Accept => application/json in the Header of all API requests. Just like below screenshot.
End Points / Routes of API:
1) User Registration API URL: http://127.0.0.1:8000/api/register
Method: POST
This is a public route, enter required fields data then press Send button to get the response from Laravel user register API. You will get response in the body section of your HTTP request similar to the below screenshot.
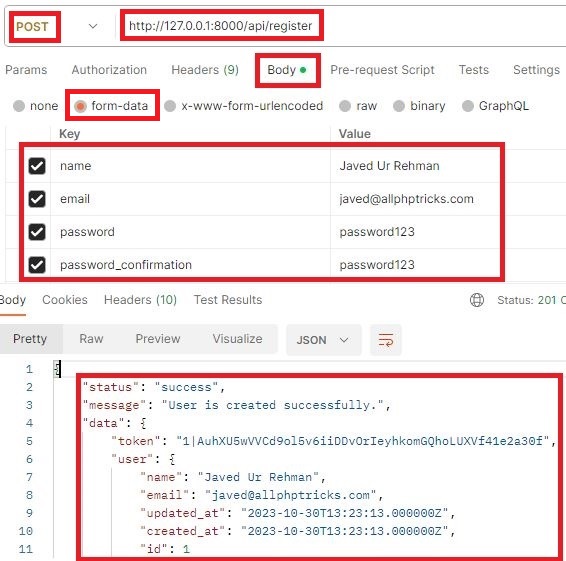
Note, in “data” -> “token” is generated which we will pass to access the protected routes.
Once user is registered, you can always login with the user credentials on the login route.
2) User Login API URL: http://127.0.0.1:8000/api/login
Method: POST
This is also a public route, enter required fields data then press Send button to get the response from Laravel user login API. Check the sample below screenshot.
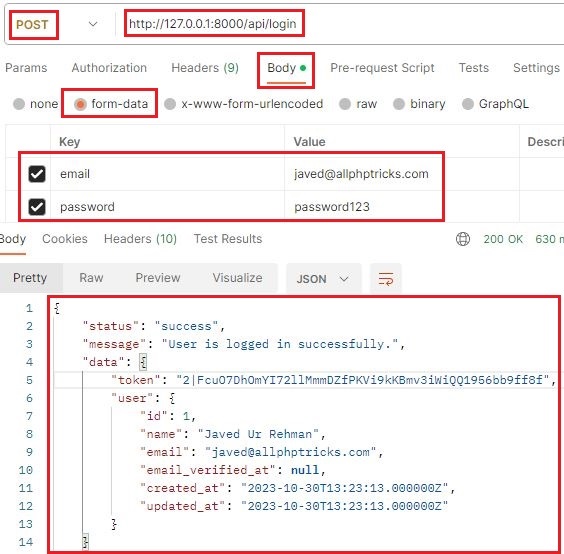
Login API also returns the “token”, now we will use token to access product protected route to create a product.
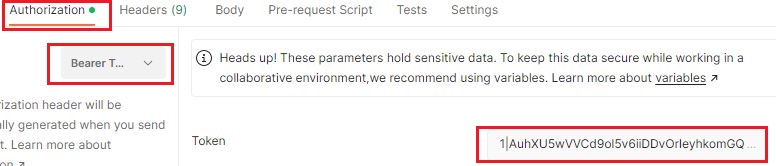
Make sure that you pass the token with each protected routes in Authorization -> Type -> Bearer Token in Token field like in below screenshot.
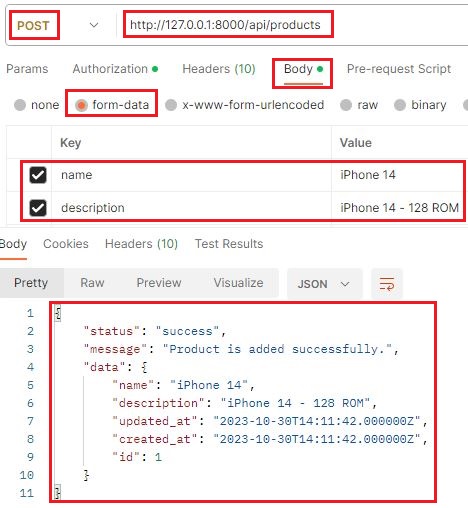
3) Create Product API URL: http://127.0.0.1:8000/api/products
Method: POST
This is a protected route, add token and enter required fields data then press Send button and check the sample below screenshot.
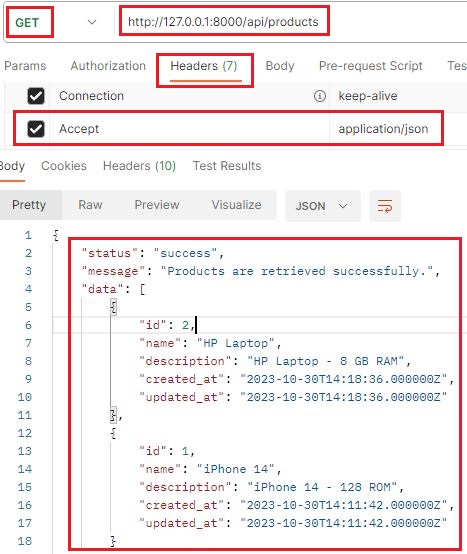
4) Show All Products API URL: http://127.0.0.1:8000/api/products
Method: GET
This is a public route, just press a Send button and check the sample below screenshot.
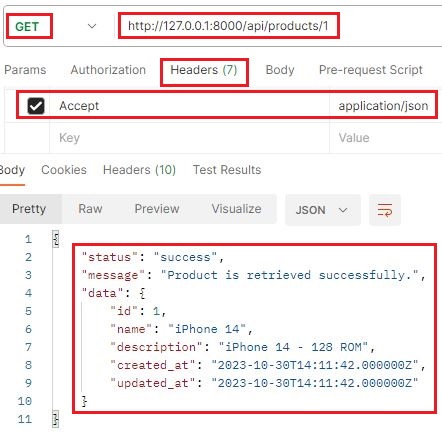
5) Show Single Product API URL: http://127.0.0.1:8000/api/products/{id}
Method: GET
This is a public route, just press a Send button and check the sample below screenshot.
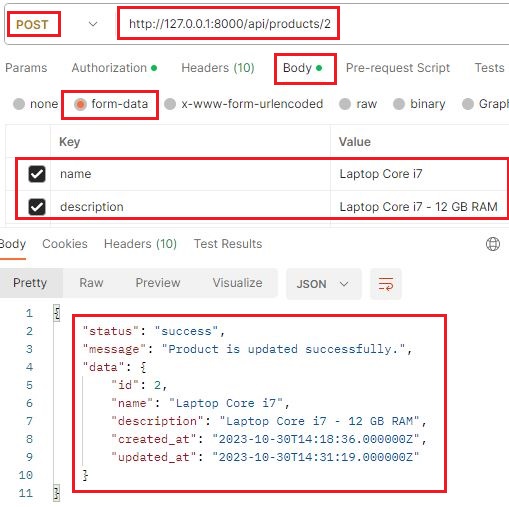
6) Update Product API URL: http://127.0.0.1:8000/api/products/{id}
Method: POST
This is a protected route, add token and enter required fields data then press a Send button and check the sample below screenshot.
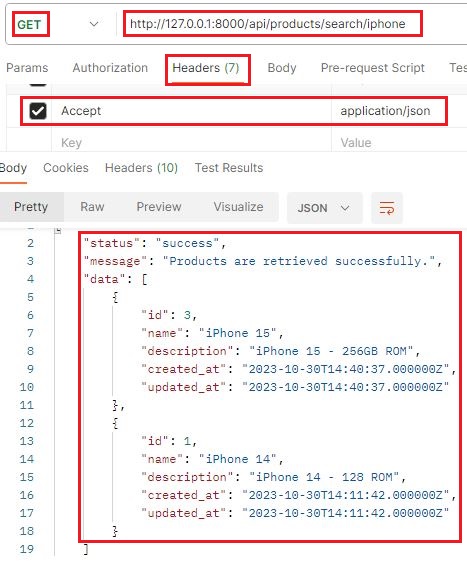
7) Search Products API URL: http://127.0.0.1:8000/api/products/search/{name}
Method: GET
This is a public route, just press a Send button and check the sample below screenshot.
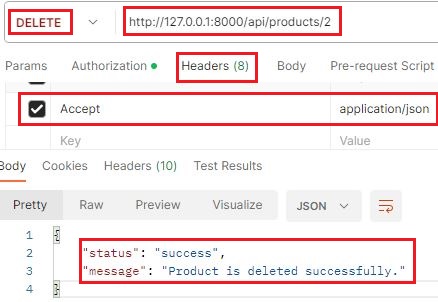
8) Delete Product API URL: http://127.0.0.1:8000/api/products/{id}
Method: DELETE
This is a protected route, just add token and press a Send button and check the sample below screenshot.
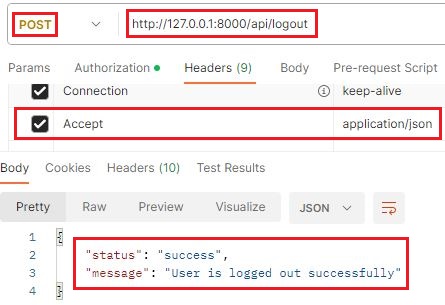
9) Logout User API URL: http://127.0.0.1:8000/api/logout
Method: POST
This is also a protected route, just add token and press a Send button and check the sample below screenshot.
Conclusion
We hope that now you have learnt how to create a Laravel 10 REST API using Sanctum authentication application by following the above easy and step by step guide.
If you found this tutorial helpful, share it with your friends and developers group.
We spent several hours to create this tutorial, if you want to say thanks so like our page on Facebook, Twitter and share it.
Facebook Official Page: All PHP Tricks
Twitter Official Page: All PHP Tricks

Thank you VERY much for this in-depth tutorial. Learning Laravel and this really helps.
Dear Terry, I am glad to know that you found my tutorial helpful, share it with others so that others can also take benefit from this tutorial.
????
Share the tutorial link on your social network to spread the knowledge with others. Thanks