
Laravel 10 Custom Validation Rule Tutorial
In this tutorial, I will show you how to create a Laravel 10 custom validation rule. Creating a custom validation rule in Laravel 10 is slightly different from the Laravel previous versions.
Although, Laravel comes with default validation rules such as required, string, email, min, max, unique and many others.
But sometimes, we need a custom validation rule based on the application requirement. For that purpose, Laravel provides a convenient way to create custom validation rule.
In Laravel 10, when we create a custom Laravel rule class to validate data, we get a validate() method to validate the form data.
The purpose of custom validation rule is reusability, this mean we can reuse this rule to multiple times without repeating the whole code again. For example, we can validate email on user registration and user profile update with the same custom created validation rule.
In this example, I will create a custom validation rule with name ValidEmailValidation to check the valid email address.
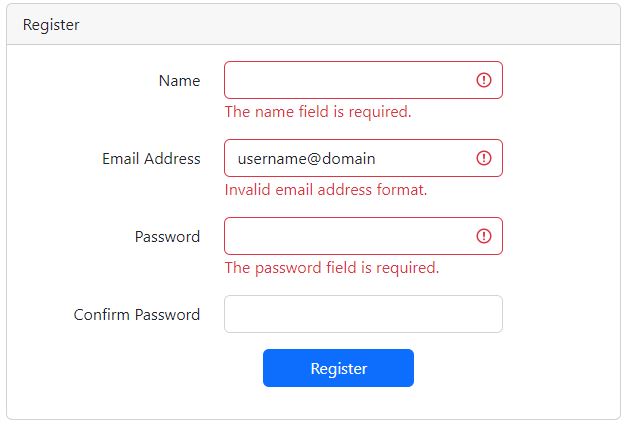
Although, Laravel also provides built in email validation rule but it accept invalid email as well such as, Laravel default email rule will accept username@domain email address which is actually invalid email address.
Therefore I am creating a custom email validation rule in Laravel 10 application.
This rule is not only validate email address format but it will also check that domain’s MX record in DNS records to ensure that email address is valid and domain is able to receive emails.
Sometimes, users enter email address of the domain that was never registered. But due to correct email format, it passes the validation of format. This double validation will ensure that we get the correct email address in our record.
Screenshot of Custom Email Validation Rule:
As you can see in the below screenshot, custom validation rule validates email address properly and gives error if invalid email address is passed to it.
Create Laravel Custom Validation Rule
I am assuming that you have already installed Laravel in your machine, If you didn’t then you can install Laravel first.
Follow the below easy steps to create Laravel custom validation rule.
1. Create Custom Validation Rule
Run the below command to create a custom email validation rule.
php artisan make:rule ValidEmailValidationThen go the the \app\Rules\ValidEmailValidation.php and update the following code in it.
<?php

namespace App\Rules;

use Closure;
use Illuminate\Contracts\Validation\ValidationRule;

class ValidEmailValidation implements ValidationRule
{
    /**
     * Run the validation rule.
     *
     * @param  \Closure(string): \Illuminate\Translation\PotentiallyTranslatedString  $fail
     */
    public function validate(string $attribute, mixed $value, Closure $fail): void
    {
        if (!filter_var($value, FILTER_VALIDATE_EMAIL)) {
            $fail('Invalid :attribute address format.');
        }else{
            $explode = explode("@", $value);
            $domain = $explode[1];
            if(!checkdnsrr($domain,"MX")) {
                $fail('Invalid :attribute address, domain email configuration is missing.');
              }
        }
    }
}
2. Create a Controller
Run the below command to create a controller.
php artisan make:controller UserValidationControllerNow go to the \app\Http\Controllers\UserValidationController.php and update the following code in it.
<?php

namespace App\Http\Controllers;

use App\Models\User;
use Illuminate\Http\Request;
use Illuminate\Support\Facades\Hash;
use Illuminate\Http\RedirectResponse;
use App\Rules\ValidEmailValidation;

class UserValidationController extends Controller
{

    public function register()
    {
        return view('register');
    }

    public function store(Request $request): RedirectResponse
    {
        $user = $request->validate([
            'name' => 'required',
            'email' => ['required', new ValidEmailValidation],
            'password' => 'required|confirmed'
        ]);

        User::create([
            'name' => $request->name,
            'email' => $request->email,
            'password' => Hash::make($request->password)
        ]);

        $request->session()->regenerate();

        return redirect()->route('register')
            ->withSuccess('New user is registered successfully.');
    }
}
Conclusion
Now you have learnt how to create a simple custom validation rule to validate form data. I hope that this tutorial will help you to understand the concept about Laravel custom validation rules.
If you found this tutorial helpful, share it with your friends and developers group.
I spent several hours to create this tutorial, if you want to say thanks so like my page on Facebook, Twitter and share it.
Facebook Official Page: All PHP Tricks
Twitter Official Page: All PHP Tricks

Thanks a lot you really really save my time thanks
Dear Taha,
Thanks for the appreciation, I am glad that you found it helpful.