
Integrate Authorize.Net Payment Gateway using PHP

In this tutorial, I will show how to integrate Authorize.Net payment gateway using PHP with step by step guide.
Payment gateway is a method which helps to charge a credit card online, this enables users to make a payment of products/services by sitting at their home.
Payment gateway is the need of every e-commerce website, which is offering product or services.
There are various providers available in the market who are offering payment gateway services. Authorize.Net payment gateway is one of the most popular online payment gateway which enables to charge credit card online.
Authorize.Net accept payments from various credit cards like Visa, MasterCard, American Express, JCB, Discover and many more.
I will show you the complete process of Authorize.Net Payment Gateway Integration using PHP, describing each steps as simple as possible to make it clear for you.
Previously, I have shown to you the complete process of PayPal Payment Integration in PHP.
Stripe is an alternate of Authorize.Net, you can learn here the process of Stripe payment gateway integration using PHP.
So without further delay, lets start Authorize.Net Payment Gateway Integration in PHP.
Steps to Integrate Authorize.Net Payment Gateway using PHP
Follow the below simple steps to Integrate Authorize.Net Payment Gateway using PHP.
- Create a Database with name allphptricks_cart
- Create a Table in DB with name authorize_payment
- Create an Authorize.Net Sandbox Account
- Import PHP SDK from Authorize.net
- Create a config.php File
- Create a dbclass.php File
- Create an index.php File
- Create an authorize-net-payment.php File
- Create an style.css File in CSS Directory
1. Create a Database with name allphptricks_cart
To create a allphptricks_cart database run the following query in the MySQL.
CREATE DATABASE allphptricks_cart;2. Create a Table in DB with name authorize_payment
To create the table run the following query in the above created DB.
CREATE TABLE `authorize_payment` (
  `id` int(11) NOT NULL AUTO_INCREMENT,
  `cc_brand` varchar(50) COLLATE utf8_unicode_ci NOT NULL,
  `cc_number` varchar(50) COLLATE utf8_unicode_ci NOT NULL,
  `amount` double(10,2) NOT NULL,
  `transaction_id` varchar(50) COLLATE utf8_unicode_ci NOT NULL,
  `auth_code` varchar(25) COLLATE utf8_unicode_ci NOT NULL,
  `response_code` enum('1','2','3','4') COLLATE utf8_unicode_ci NOT NULL COMMENT '1=Approved | 2=Declined | 3=Error | 4=Held for Review',
  `response_desc` varchar(25) COLLATE utf8_unicode_ci NOT NULL COMMENT 'Approved | Error',
  `payment_response` varchar(100) COLLATE utf8_unicode_ci NOT NULL,
  `created_at` datetime NOT NULL DEFAULT current_timestamp(),
   PRIMARY KEY (`id`)
) ENGINE=InnoDB DEFAULT CHARSET=utf8 COLLATE=utf8_unicode_ci;
We will use this table to store information about payment related information, you can also store any required information that you are taking from your customer like customer name, email etc.
Note: I have also attached the SQL file of this table in download.
3. Create an Authorize.Net Sandbox Account
Authorize.Net provides a Sandbox account, it is a testing account which helps to integrate the Authorize.net payment gateway and allow us to perform a testing transactions by using the testing credit card details.
It provides a Sandbox API Login ID and Transaction Key to test the transaction on the Staging/Sandbox environment.
Before moving towards the Production environment, it is mandatory to test the Authorize.Net payment gateway on Sandbox environment to integrate it properly and eliminate errors.
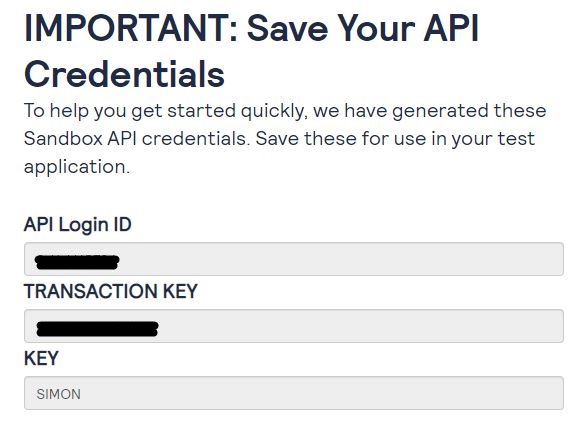
Create Authorize.Net sandbox account and get your Sandbox API Login ID and Transaction Key.
You will also get a transaction notification on the same email which you used for the account creation. So create your own sandbox account for testing.
Once you created an account on Sandbox, it will generate and display your Sandbox API Login ID and Transaction Key. Save those keys, we will use them later.
4. Import PHP SDK from Authorize.net
We will need to import the PHP SDK from Authorize.net to access the Authorize.net API to charge and process the credit card transaction payment online.
There are two ways, you can download and include the PHP SDK from Authorize.net and I will share the both method with you.
- Import with Composer (Recommended)
- Download a zip file of PHP SDK
i. Import with Composer (Recommended)
To import PHP SDK from Authorize.net using Composer, first you will need to make sure that composer is installed on your system, if you do not have composer on your machine, this tutorial will help you to install composer on Windows 10/11.
After that create a composer.json file in your application directory and add the following code in it.
{
  "require": {
    "php": ">=5.6",
    "ext-curl": "*",
    "authorizenet/authorizenet": ">=1.9.3"
  }
}
After creating this file, open the command prompt/cmd and change directory to your current application directory where you are creating files of Authorize.Net payment integration then run the following command to import the PHP SDK.
composer updateIt should be something like below screenshot.
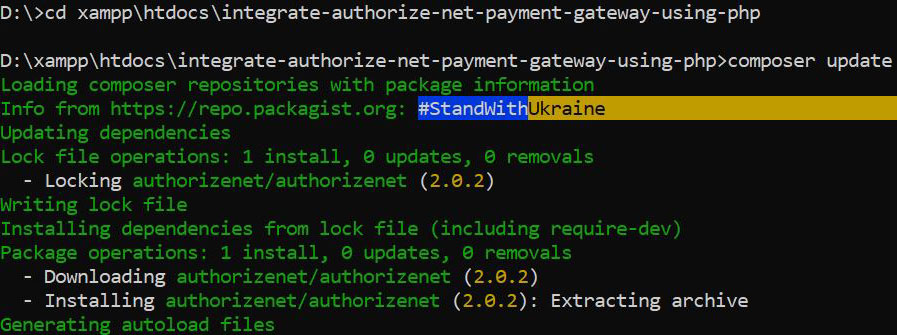
Once the PHP SDK is imported, it will create a new directory with name vendor in your current application directory.
If you don’t want to go with the recommended method then you can use the following method.
ii. Download a zip file of PHP SDK
I have uploaded the PHP SDK of Authorize.Net, click here to download the PHP SDK zip file.
5. Create a config.php File
Create a config.php file and paste the following code in the file.
<?php
//Authorize.Net Credentials Configuration
define("AUTHORIZE_API_LOGIN_ID", "YOUR AUTHORIZE API LOGIN ID");
define("AUTHORIZE_TRANSACTION_KEY", "YOUR AUTHORIZE TRANSACTION KEY");
define("AUTHORIZE_ENV", "SANDBOX");
// define("AUTHORIZE_ENV", "PRODUCTION");

// Database Credentials Configuration
define('DB_HOST', 'localhost');
define('DB_NAME', 'Your Database Name');
define('DB_USERNAME', 'Your Database Username');
define('DB_PASSWORD', 'Your Database Password');
?>
The above config.php file contains the Authorize.Net and Database credentials configuration details, you will need to update these credentials.
6. Create a dbclass.php File
Create a dbclass.php file and paste the following code in the file.
<?php
// Start Database Class
class DB
{
	private $db_host = DB_HOST;
	private	$db_name = DB_NAME;
	private $db_user = DB_USERNAME;
	private	$db_pass = DB_PASSWORD;

	private $dbh;
	private $error;
	private $stmt;

	public function __construct()
	{
		//Set DSN (Data Source Name)
		$dsn = 'mysql:host='.$this->db_host.';dbname='.$this->db_name;
		$db_options = array(
			PDO::ATTR_ERRMODE => PDO::ERRMODE_EXCEPTION
		);
		try
		{
			$this->dbh = new PDO($dsn, $this->db_user, $this->db_pass, $db_options);
		}
		catch(PDOException $e)
		{
			echo $this->error = $e->getMessage();
		}
	}

	public function query($query)
	{
		$this->stmt = $this->dbh->prepare($query);
	}

	public function bind($param, $value, $type = null)
	{
		if(is_null($type))
		{
			switch(true)
			{
				case is_int($value);
					$type = PDO::PARAM_INT;
					break;
				case is_bool($value);
					$type = PDO::PARAM_BOOL;
					break;
				case is_null($value);
					$type = PDO::PARAM_NULL;
					break;
				default;
					$type = PDO::PARAM_STR;
			}
		}
		$this->stmt->bindValue($param, $value, $type);
	}

	public function execute($array = null)
	{
		return $this->stmt->execute($array);
	}

	public function lastInsertId()
	{
		return $this->dbh->lastInsertId();
	}

	public function rowCount()
	{
		return $this->stmt->rowCount();
	}

	public function result($array = null)
	{
		$this->execute($array);
		return $this->stmt->fetch();
	}

	public function resultSet($array = null)
	{
		$this->execute($array);
		return $this->stmt->fetchAll(PDO::FETCH_ASSOC);
	}

	public function close()
	{
		return $this->dbh = null;
	}
}
// End Database Class
?>
We will use this dbclass.php to store payment information into database. I have made a separate tutorial about this class, it is a class which is using a PDO Prepared Statements to store data into DB.
If you are not familiar with PDO then you can check out my tutorial about PHP CRUD operations using PDO prepared statements.
7. Create an index.php File
Create an index.php file and paste the following code in the file.
<?php
$status = "";
$response_type ='danger';
if ($_SERVER['REQUEST_METHOD'] == 'POST'){
// User card information data received via form submit
$cc_number = $_POST['cc_number'];
$cc_exp_month = $_POST['cc_exp_month'];
$cc_exp_year = $_POST['cc_exp_year'];
$cc_exp_year_month = $cc_exp_year.'-'.$cc_exp_month;
$cvc_code = $_POST['cvc_code'];
$amount = $_POST['amount'];
if(empty($cc_number) || empty($cc_exp_month) || empty($cc_exp_year) || empty($cvc_code) ){
$status = "<li>Error: Please enter all required fields!</li>";
}else{
require_once 'authorize-net-payment.php';
}
}
?>
<html>
<head>
<title>Demo Integrate Authorize.Net Payment Gateway using PHP - AllPHPTricks.com</title>
<link rel='stylesheet' href='css/style.css' type='text/css' media='all' />
</head>
<body>
<div style="width:700px; margin:50 auto;">
<h2>Demo Integrate Authorize.Net Payment Gateway using PHP - AllPHPTricks.com</h2>
<?php if(!empty($status)) { ?>
<div class="alert alert-<?php echo $response_type;?>">
<ul>
<?php echo $status; ?>
</ul>
</div>
<?php } ?>
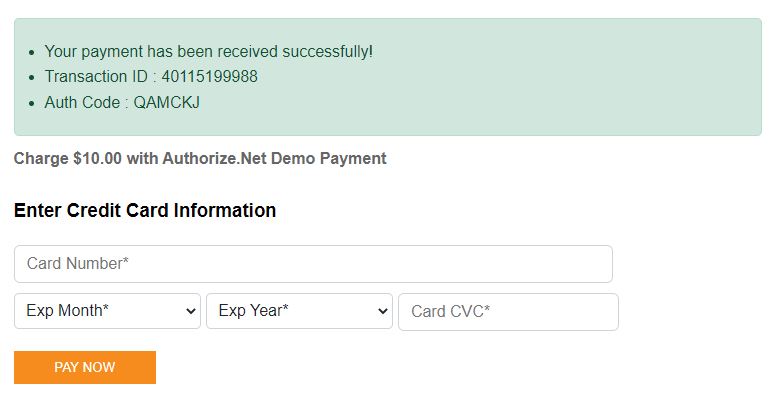
<p><strong>Charge $10.00 with Authorize.Net Demo Payment</strong></p>
<form method='post' action=''>
<input type='hidden' name='amount' value='10.00'>
<h3>Enter Credit Card Information</h3>
<input name="cc_number" type="text" class="form-control" maxlength="20" placeholder="Card Number*" style="width:80%;">
<select name="cc_exp_month" class="form-select">
<option value="">Exp Month*</option>
<?php
for ($m=1; $m<=12; $m++) {
if($m<10){
$new_m='0'.$m;
}else{
$new_m=$m;
}
$month = date('F', mktime(0,0,0,$m, 1, date('Y')));
echo "<option value='$new_m'>$new_m - $month</option>";
}
?>
</select>
<select name="cc_exp_year" class="form-select">
<option value="">Exp Year*</option>
<?php for($fy=2022; $fy<=2030; $fy++) { ?>
<option value="<?php echo $fy; ?>"><?php echo $fy; ?></option>
<?php } ?>
</select>
<input name="cvc_code" type="text" class="form-control" maxlength="3" placeholder="Card CVC*">
<button type='submit' class='pay'>Pay Now</button>
</form>
</div>
</body>
</html>The above code will generate an HTML form for taking credit card information such as Credit Card number, expire month/year and CVC.
Once user enter the required detail and click on Pay Now button then it will validate input data, if all required data is present then it will simply pass credit card information to Authorize.Net API to charge credit card.
8. Create an authorize-net-payment.php File
Create an authorize-net-payment.php file and paste the following code in the file.
<?php
require_once 'vendor/autoload.php';
require_once "config.php";
require_once('dbclass.php');
use net\authorize\api\contract\v1 as AnetAPI;
use net\authorize\api\controller as AnetController;

// Create a unique reference ID of transaction
$ref_id = 'ref_id_' . time();

// Create a MerchantAuthenticationType object with the authentication details
// which are availale in the config.php file
$merchant_authentication = new AnetAPI\MerchantAuthenticationType();
$merchant_authentication->setName(AUTHORIZE_API_LOGIN_ID);
$merchant_authentication->setTransactionKey(AUTHORIZE_TRANSACTION_KEY);

// Create the payment data object using a credit card details
$credit_card = new AnetAPI\CreditCardType();
$credit_card->setCardNumber($cc_number);
$credit_card->setExpirationDate($cc_exp_year_month);
$credit_card->setCardCode($cvc_code); // Optional

 // Now add the payment data to a PaymentType object
$payment_type = new AnetAPI\PaymentType();
$payment_type->setCreditCard($credit_card);

// Create an order information object (Optional)
$order_info = new AnetAPI\OrderType();
$order_info->setInvoiceNumber("20230001"); // Optional
$order_info->setDescription("Laptop Bag");

// Create a customer's identifying information object (Optional)
$customer_data = new AnetAPI\CustomerDataType();
$customer_data->setType("individual");
$customer_data->setId("9998659"); // Optional
$customer_data->setEmail("[email protected]");

 // Create customer's Bill To address object and set data (Optional)
$customer_billing = new AnetAPI\CustomerAddressType();
$customer_billing->setFirstName("Javed Ur");
$customer_billing->setLastName("Rehman");
$customer_billing->setCompany("AllPHPTricks.com");
$customer_billing->setAddress("12 Sunset Street");
$customer_billing->setCity("Karachi");
$customer_billing->setState("Sindh");
$customer_billing->setZip("75080");
$customer_billing->setCountry("Pakistan");
$customer_billing->setPhoneNumber("123456789");

 // Create customer's Ship To address object and set data (Optional)
$customer_shipping = new AnetAPI\CustomerAddressType();
$customer_shipping->setFirstName("Javed Ur");
$customer_shipping->setLastName("Rehman");
$customer_shipping->setAddress("12 Sunset Street");
$customer_shipping->setCity("Karachi");
$customer_shipping->setState("Sindh");
$customer_shipping->setZip("75080");
$customer_shipping->setCountry("Pakistan");

// Create a TransactionRequestType object and set all created objects in it
$transaction_request_type = new AnetAPI\TransactionRequestType();
$transaction_request_type->setTransactionType("authCaptureTransaction");
$transaction_request_type->setAmount($amount);
$transaction_request_type->setPayment($payment_type);
$transaction_request_type->setOrder($order_info);
$transaction_request_type->setCustomer($customer_data);
$transaction_request_type->setBillTo($customer_billing);
$transaction_request_type->setShipTo($customer_shipping);

// Create a complete transaction request
$transaction_request = new AnetAPI\CreateTransactionRequest();
$transaction_request->setMerchantAuthentication($merchant_authentication);
$transaction_request->setRefId($ref_id);
$transaction_request->setTransactionRequest($transaction_request_type);

// Create the controller and get the final response
$controller = new AnetController\CreateTransactionController($transaction_request);
$response = $controller->executeWithApiResponse(constant("\\net\authorize\api\constants\ANetEnvironment::".AUTHORIZE_ENV));

if ($response != null) {
    // Check if the Authorize.net has received the API request successfully
    // and return transaction response back to us
    if ($response->getMessages()->getResultCode() == "Ok") {
        // Ok means API request was successful
        // Get transaction response and store in DB
        $tresponse = $response->getTransactionResponse();
        $responseDesc = array("1"=>"Approved", "2"=>"Declined", "3"=>"Error", "4"=>"Held for Review");

        if ($tresponse != null && $tresponse->getMessages() != null) {
            // Create variables to store transaction information in DB
            $cc_brand = $tresponse->getaccountType();
            $cc_number = $tresponse->getaccountNumber();
            $transaction_id = $tresponse->getTransId();
            $auth_code = $tresponse->getAuthCode();
            $response_code = $tresponse->getResponseCode();
            $response_desc = $responseDesc[$response_code];
            $payment_response = $tresponse->getMessages()[0]->getDescription();

            $db = new DB;
            $db->query("INSERT INTO `authorize_payment` (`cc_brand`, `cc_number`, `amount`, `transaction_id`, `auth_code`, `response_code`, `response_desc`, `payment_response`) VALUES (:cc_brand, :cc_number, :amount, :transaction_id, :auth_code, :response_code, :response_desc, :payment_response)");
            $db->bind(":cc_brand", $cc_brand);
            $db->bind(":cc_number", $cc_number);
            $db->bind(":amount", $amount);
            $db->bind(":transaction_id", $transaction_id);
            $db->bind(":auth_code", $auth_code);
            $db->bind(":response_code", $response_code);
            $db->bind(":response_desc", $response_desc);
            $db->bind(":payment_response", $payment_response);
            $db->execute();
            $db->close();
            $status = '<li>Your payment has been received successfully!</li>';
            $status .=  "<li>Transaction ID : ".$transaction_id."</li>";
            $status .=  "<li>Auth Code : ".$auth_code."</li>";
            $response_type = "success";
        } else {
            $status =  "<li>Transaction has failed!</li>";
            if ($tresponse->getErrors() != null) {
                $status .=  "<li>Error Code : ".$tresponse->getErrors()[0]->getErrorCode()."</li>";
                $status .=  "<li>Error Message : ".$tresponse->getErrors()[0]->getErrorText()."</li>";
            }
        }
    } else {
        // If the Authorize.net API request wasn't successful
        // then display errors on the screen
        $tresponse = $response->getTransactionResponse();
        $status =  "<li>Transaction has failed!</li>";
        if ($tresponse != null && $tresponse->getErrors() != null) {
            $status .=  "<li>Error Code : ".$tresponse->getErrors()[0]->getErrorCode()."</li>";
            $status .=  "<li>Error Message : ".$tresponse->getErrors()[0]->getErrorText()."</li>";
        } else {
            $status .=  "<li>Error Code : ".$response->getMessages()->getMessage()[0]->getCode()."</li>";
            $status .=  "<li>Error Message : ".$response->getMessages()->getMessage()[0]->getText()."</li>";
        }
    }
} else {
    $status =  "<li>Transaction has failed! No response returned.</li>";
}
This is the file which we are using to charge the credit card, I have hard coded values of different fields, you can take input from user using html input form and pass those values in the relevant place.
There are various information which are optional such as order information, customer data, billing and shipping address. However, if you provide these information then it will be available in your Authorize.Net Merchant Account and same information will be sent to you on your email from Authorize.Net upon completion of transaction.
We are simply calling the Authorize.Net API to charge the credit card, if transaction is successful then it will store transaction information in database table authorize_payment, otherwise, the error message will be displayed on the screen.
9. Create an style.css File in CSS Directory
Create an style.css file in /css directory and paste the following code in the file to style our form.
body {
    font-family: Arial, sans-serif;
    line-height: 1.6;
}
.pay {
	text-transform: uppercase;
    background: #F68B1E;
    border: 1px solid #F68B1E;
    cursor: pointer;
    color: #fff;
    padding: 8px 40px;
    margin-top: 10px;
}
.pay:hover {
	background: #f17e0a;
    border-color: #f17e0a;
}
.form-control {
    display: block;
    padding: 0.375rem 0.75rem;
    font-size: 1rem;
    font-weight: 400;
    line-height: 1.5;
    color: #212529;
    border: 1px solid #ced4da;
    border-radius: 0.375rem;
	margin-bottom: 10px;

}
.form-select {
    display: block;
    width: 25%;
	float:left;
    padding: 0.475rem;
    -moz-padding-start: calc(0.75rem - 3px);
    font-size: 1rem;
    font-weight: 400;
    line-height: 1.5;
    color: #212529;
	border: 1px solid #ced4da;
    border-radius: 5px;
	margin-bottom: 10px;
	margin-right: 5px;
}
.alert{
    padding: 20px;
    border-radius: 5px;
    padding-left: 30px;
    margin-bottom: 10px;
}
.alert-danger{
    color: #842029;
    background-color: #f8d7da;
    border: 1px solid #f5c2c7;
}
.alert-success{
    color: #0f5132;
    background-color: #d1e7dd;
    border: 1px solid #badbcc;
}
Now, you can test the transaction with testing credit card like VISA – 4111111111111111 and any future card expire date and any CVC code.
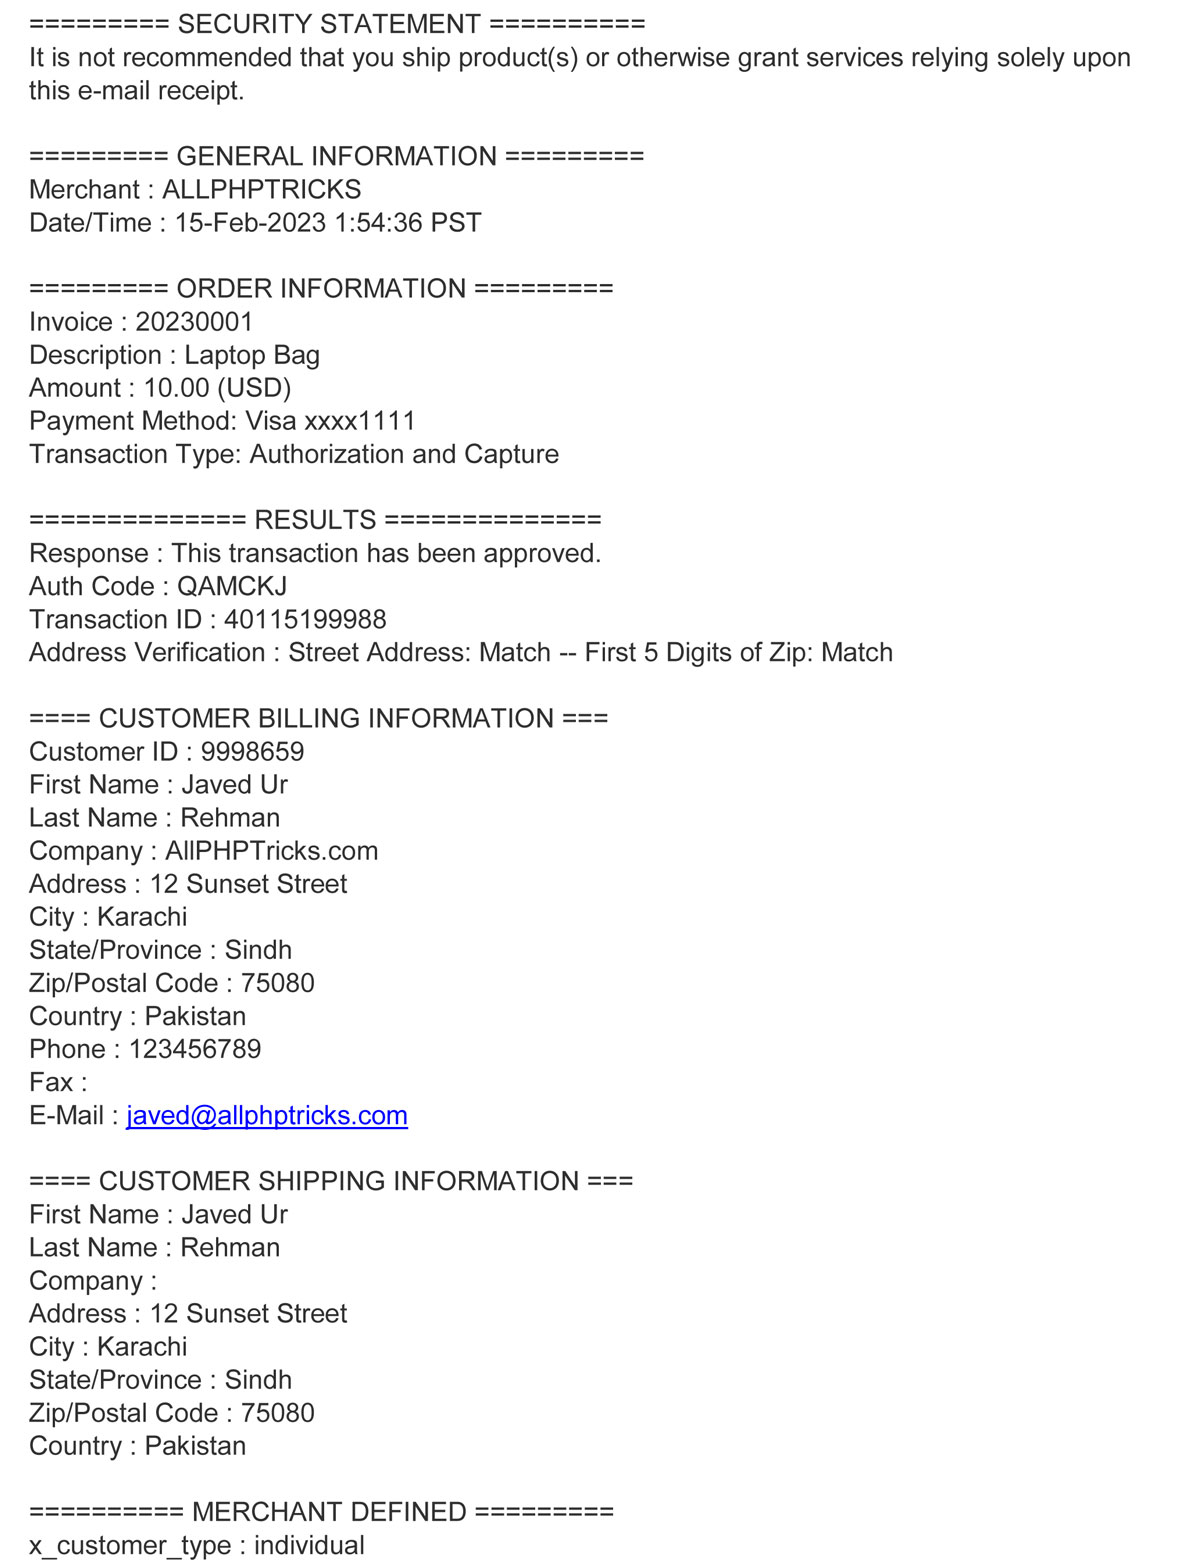
After successful payment, you will get an email like below from authorize.net about the transaction details.
Set Authorize.Net Payment Gateway to Production Environment
After successfully integration of Authorize.Net payment gateway using PHP on Sandbox environment, we have to switch it to the Production environment to receive the actual online payments using Authorize.Net.
Follow the below simple steps:
- Create your authorize.net merchant account from here account.authorize.net
- Get your production environment API Login id and the Transaction key and replace them in your config.php
- Change the AUTHORIZE_ENV value in config.php from SANDBOX to PRODUCTION
Now you are ready to get online payment using the real credit card with Authorize.Net using PHP.
Conclusion
By following the above step by step guide, you will be able to easily integrate Authorize.Net payment gateway using PHP.
If you found this tutorial helpful, share it with your friends and developers group.
I spent several hours to create this tutorial, if you want to say thanks so like my page on Facebook, Twitter and share it.
I would like you to share your experience in the comment section below, if you are successful in the integration process so share how do you like my code and if you are not able to process the transaction, share your issue in the comment section below.
Facebook Official Page: All PHP Tricks
Twitter Official Page: All PHP Tricks


Is it possible to integrate the Authorize.net payment gateway with PHP using AJAX call? I want to enable credit card payment in a modal box, so the user experience is good.
Dear Ryan, yes you can use Ajax along with stripe, you will need to perform the same actions on ajax call which I am using on form submit.