
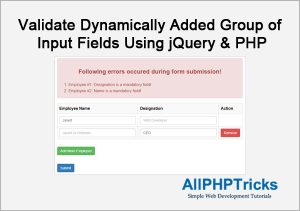
Validate Dynamically Added Group of Input Fields Using jQuery & PHP
Today, in this tutorial, I will show you how to validate dynamically added group of input fields using jQuery & PHP.
This tutorial is a second part of tutorial “how to add remove group of input fields dynamically using jQuery“, I have already shown how to add remove group of input fields dynamically using jQuery, so if you do not know how to do that, I would recommend you all to check out that tutorial first.
Validation is very important for any web application, to keep my tutorials as simple as possible, I am writing this tutorial separately. Every web based form must have client side and server side validations.
In this tutorial, I will only focus on the client sider and server side validations, so to better understand this tutorial, I am assuming that you already have checked out my tutorial about adding/removing group of input fields dynamically.
Steps of Validating Dynamically Added Group of Input Fields Using jQuery & PHP
There are four steps required which are following:
- Adding CSS for Validations
- Adding JavaScript Validation Script
- Adding Server Side PHP Validation Script
- Display Error Message in HTML Body
1. Adding CSS for Validations
Add the following CSS in your existing style.css file for validation styling.
.required{
    border: 1px solid #f00 !important;
    color: #f00 !important;
}
.alert {
    padding: 15px;
    margin-bottom: 20px;
    border: 1px solid transparent;
    border-radius: 4px;
}
.alert-danger {
    color: #a94442;
    background-color: #f2dede;
    border-color: #ebccd1;
}
.alert-danger ol{
    margin-left: 30px;
}
.text-center{
    text-align: center;
}
2. Adding JavaScript Validation Script
We need to add the following JavaScript in the footer section.
$("input[type=submit]").click(function(e){
    $("table input").removeClass("required");
    var error_list = "";
    <?php
    for ($i = 1; $i <= 10; $i++) {
    echo '
    if ($("#employee_name'.$i.'").length){
        if ($.trim($("#employee_name'.$i.'").val()) === ""){
            error_list =
            error_list+"\nEmployee #'.$i.': Name is a mandatory field!";
            $("#employee_name'.$i.'").addClass("required");
        }
        if ($.trim($("#designation'.$i.'").val()) === ""){
            error_list =
            error_list+"\nEmployee #'.$i.': Designation is a mandatory field!";
            $("#designation'.$i.'").addClass("required");
        }
    }';
    }
    ?>
    if(error_list!=""){
        alert("Following fields are mandatory!"+error_list);
        return false;
    }
});
Let me explain the above JavaScript code, so you get the idea what is happening in the above script.
$("input[type=submit]").click(function(e){}The above line is checking if user has pressed the submit button, when user clicked on submit button then we can start validation of all dynamic added group of input fields.
First we removed the .remove class from all input fields. Then we need to check if input field exist or not, it is because we have given provision to add 10 group of input fields dynamically, so first we need to check if user has added that input field before validation.
I used the PHP for loop to generate validations for all 10 group of input fields so that I do not need to repeat my code for all group of input fields and it will keep our code clean.
I validated all 10 group of input fields, but I am sharing below code for 1 group of input fields, validation will remain same for all.
if ($("#employee_name1").length){
        if ($.trim($("#employee_name1").val()) === ""){
            error_list =
            error_list+"\nEmployee #1: Name is a mandatory field!";
            $("#employee_name1").addClass("required");
        }
        if ($.trim($("#designation1").val()) === ""){
            error_list =
            error_list+"\nEmployee #1: Designation is a mandatory field!";
            $("#designation1").addClass("required");
        }
    }
The above code is the validation of first group of input fields. My PHP for loop is generating same validations for all 10 group of input fields.
if ($("#employee_name1").length){}First we are checking in the above line of code that if #employee_name1 exist in the html. If it return true then we can validate it.
Then we are checking if #employee_name1 field value is empty then add it in the error list and add required class to the input field using element ID to highlight it. We are doing same for the #designation1.
In my JavaScript code, I am doing it for all 10 group of input fields using PHP for loop. In this way, we can easily perform client side validation for all dynamically added group of input fields.
3. Adding Server Side PHP Validation Script
Add the below server side PHP validation script in the header section or top of the page.
$error ="";
if ($_SERVER['REQUEST_METHOD'] == 'POST'){
    if (empty(array_filter($_POST['employee_name'])) &&
         empty(array_filter($_POST['designation']))){
        $error .= "<li>Please enter Employee Name & Designation!</li>";
    }else{
        if (is_array($_POST['employee_name'])) {
            $i=1;
            foreach($_POST['employee_name'] as $key => $employee_name) {
                $designation = $_POST['designation'][$key];
                if (empty($employee_name) ){
                    $error .= "<li>Employee #$i: Name is a mandatory field!</li>";
                    }
                if (empty($designation) ){
                    $error .= "<li>Employee #$i: Designation is a mandatory field!</li>";
                    }
                $i++;
                }
        }
    }
}
The above PHP server side validation is checking that if form request method is POST, then validate the form.
With the use of the following, we can check if form is submitted or not. When the form is submitted, it will always return the POST.
if ($_SERVER['REQUEST_METHOD'] == 'POST'){}After that we are checking that if both input array are empty then assign error message to $error variable.
If any input array is not empty then simple check if Employee Name and Designation are empty for complete array using foreach() loop.
If it found any field is empty then assign error message to $error variable.
4. Display Error Message in HTML Body
Now this is the final step, we need to check if form is submitted and $error variable is not empty so display all errors on the screen.
Copy paste the below code in the body section before the group of input fields.
if ($_SERVER['REQUEST_METHOD'] == 'POST' && $error!=''){
echo "<div class='alert alert-danger'>
        <h2 class='text-center'>
        Following errors occured during form submission!
        </h2>
        <ol>".$error."</ol>
        </div>";
}
Conclusion
By now, you know how to validate dynamically added group of input fields using jQuery and PHP. I have shared both client side and server side validations, so that you get the correct data without any error.
With this tutorial, you will be able to validate your group of input fields. However, if you still face any issue during validation, share it in the comment section below, I will try my best to resolve your issues.
If you found this tutorial helpful, share it with your friends and developers group.
I spent several hours to create this tutorial, if you want to say thanks so like my page on Facebook, Twitter and share it.
Facebook Official Page: All PHP Tricks
Twitter Official Page: All PHP Tricks


Dear: JAVED UR REHMAN
I am getting the error “mail() has been disabled for security reasons ajax.php on line 22” in the ajax.php file..
I don’t know enough about ajax.
Is there anything I need to change in this line?
Or where am I going wrong?
$sent = mail($to,$subject,$message,$headers);
Best regards…
I will suggest you to comment only in the relevant tutorial to get better understanding, In this tutorial, I am not using any mail() function.