
Add Remove Group of Input Fields Dynamically Using jQuery
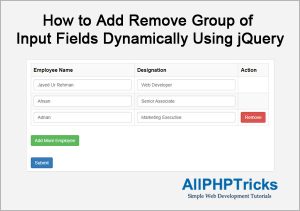
In this tutorial, I will show you how to Add Remove Group of Input Fields Dynamically Using jQuery.
When working with the user profile form, you may need to get user qualification, experience or other group of input fields. User can add more than one group of input fields like Qualification details.
In this case, you will need to give an option to user to add group of input fields dynamically using jQuery.
Previously, I have written a tutorial on how to add remove input fields dynamically using jQuery but it was accepting only one input field, I would recommend you to check it out for basic understanding of adding input fields dynamically using jQuery.
This tutorial is an advanced version of my previous tutorial which allows to add remove group of input fields dynamically using jQuery and PHP.
Steps of How to Add Remove Group of Input Fields Dynamically Using jQuery
There are mainly five key steps which are required to add remove group of input fields dynamically using jQuery, which are listed below.
- Create a Basic HTML Form with Group of Input Fields
- Create a CSS File
- Write a jQuery Script to Add Group of Input Fields Dynamically
- Write a PHP Script To Get & Store Group of Input Fields Data
- Display Filled Form Data into HTML Form After Form Submit
1. Create a Basic HTML Form with Group of Input Fields
Create an index.php file and paste the following HTML form code in it.
<form name="FormData" method="post" action="" >
<table border="0" width="100%" class="table" id="employee_table">
    <tbody>
        <tr>
            <th>Employee Name</th>
            <th>Designation</th>
            <th style="width:96px;">Action</th>
        </tr>
        <tr>
        <td>
            <input type="text" id="employee_name1"
                    name="employee_name[]" placeholder="Javed Ur Rehman" />
        </td>
        <td>
            <input type="text" id="designation1"
                    name="designation[]" placeholder="Web Developer" />
        </td>
        <td></td>
        </tr>
    </tbody>
</table>
<button class="add_employee">Add More Employee</button>
<br><br>
<input type="submit" value="Submit">
</form>
This is a very simple HTML form, the notable thing is that, it contains name=”employee_name[]” I have made it an array by placing [] in the end of the name attribute. This will help PHP array to get all values in it.
But this is very basic form, this is just for your basic understanding.
I will not use it because I also want to display submitted data into form, so use the code available in the Step#5. But initially you can follow the step by step guide, later replace Step#01 code with Step#05.
2. Create a CSS File
Create an style.css file and copy paste the below CSS in it for styling our form.
body {
	margin:0px;
	font-family:Arial, Helvetica, sans-serif;
	}
::placeholder {
    color: #b1b3b2;
    opacity: 1; /* Firefox */
}
:-ms-input-placeholder { /* Internet Explorer 10-11 */
    color: #b1b3b2;
}
::-ms-input-placeholder { /* Microsoft Edge */
    color: #b1b3b2;
}
.table{
    width: 100%;
    max-width: 100%;
    margin-bottom: 20px;
    border: 1px solid #ddd;
    border-collapse: collapse;
}
.table>tbody>tr:nth-of-type(odd) {
    background-color: #f9f9f9;
}
.table>tbody>tr>td, .table>tbody>tr>th{
    border: 1px solid #ddd;
    padding: 8px;
    text-align: left;
}
.table input{
    display: block;
    width: 100%;
    height: 34px;
    padding: 6px 12px;
    font-size: 14px;
    line-height: 1.42857143;
    color: #555;
    background-color: #fff;
    background-image: none;
    border: 1px solid #ccc;
    border-radius: 4px;
    -webkit-box-shadow: inset 0 1px 1px rgb(0 0 0 / 8%);
    box-shadow: inset 0 1px 1px rgb(0 0 0 / 8%);
    -webkit-transition: border-color ease-in-out .15s,-webkit-box-shadow ease-in-out .15s;
    -o-transition: border-color ease-in-out .15s,box-shadow ease-in-out .15s;
    transition: border-color ease-in-out .15s,box-shadow ease-in-out .15s;
}
.table input:focus {
    border-color: #66afe9;
    outline: 0;
    -webkit-box-shadow: inset 0 1px 1px rgb(0 0 0 / 8%), 0 0 8px rgb(102 175 233 / 60%);
    box-shadow: inset 0 1px 1px rgb(0 0 0 / 8%), 0 0 8px rgb(102 175 233 / 60%);
}
button, input[type=submit]{
    color: #fff;
    display: inline-block;
    padding: 6px 12px;
    margin-top: 10px;
    margin-bottom: 0;
    font-size: 14px;
    font-weight: 400;
    line-height: 1.42857143;
    text-align: center;
    cursor: pointer;
    white-space: nowrap;
    vertical-align: middle;
    border: 1px solid transparent;
    border-radius: 4px;
}
button {
    background-color: #5cb85c;
    border-color: #4cae4c;
}
button:focus, button:hover {
    background-color: #449d44;
    border-color: #398439;
}
input[type=submit]{
    background-color: #337ab7;
    border-color: #2e6da4;
}
input[type=submit]:focus, input[type=submit]:hover {
    background-color: #286090;
    border-color: #204d74;
}
.remove_employee{
    margin: 0px;
    background-color: #d9534f;
    border-color: #d43f3a;
}
.remove_employee:hover {
    background-color: #c9302c;
    border-color: #ac2925;
}
3. Write a jQuery Script to Add Group of Input Fields Dynamically
Now, write the jQuery script in the index.php to add group of input fields dynamically & also include jQuery library. Recommended place is the footer section before closing of html body tag.
<script src="https://ajax.googleapis.com/ajax/libs/jquery/3.3.1/jquery.min.js">
</script>

<script>

// //Add Employee
$(document).ready(function() {
    var max_rows   = 10; //Maximum allowed group of input fields
    var wrapper    = $("#employee_table"); //Group of input fields wrapper
    var add_button = $(".add_employee"); //Add button class or ID
    var x = <?php echo $total_employee; ?>; //Initial group of input fields count

    $(add_button).click(function(e){ //On click add employee button
        e.preventDefault();
        if(x < max_rows){ //max group of input fields allowed
            x++; //group of input fields increment
            $('#employee_table tr:last td:last-child').html("");
            $(wrapper).append('<tr><td><input type="text" id=\"employee_name'+x+'\" name="employee_name[]" placeholder="Javed Ur Rehman" /></td><td><input type="text" id=\"designation'+x+'\" name="designation[]" placeholder="Web Developer" /></td><td><button class="remove_employee">Remove</button></td></td></tr>'); //add group of input fields
	}
    });

    $(wrapper).on("click",".remove_employee", function(e){ // On click to remove button
        e.preventDefault(); $(this).parent().parent().remove(); x--;
        var rowCount = $("#employee_table tr").length;
        if(rowCount>2){
            $('#employee_table tr:last td:last-child').html('<button class="remove_employee">Remove</button></td>');
        }
    });

});
</script>
The above jQuery script is simply performing two actions, adding and removing group of input fields.
Although, I have commented in almost each line of code to make it clear, but let me explain few things in details.
max_rows is the total number of group of input fields you can add, you can increase or decrease it as per your need.
I have set the 10 group of input fields as default.
wrapper is a parent of all group of input fields.
We are using HTML table as a wrapper with table ID #employee_table.
add_button is the variable which selects the Add More Employee button.
Whenever the user click on Add More Employee button, It will add one row in it.
Variable x is the total group of input fields available in the form, initially it is one.
However, it is possible that it changes its value when the form gets submitted with two or more group of input fields.
Therefore, I have made it dynamic using PHP $total_employee variable, when the form load first time, it will always be 1.
And when user submit the form, it will count the all dynamic input fields and pass the value to variable x.
This is very important to check variable x value otherwise, user will be able to submit more than 10 group of input fields.
After that there are two functions. When user click on Add more Employee button, a new HTML table row is appended along with group of input fields.
When user click on remove button, it will remove the row from the table.
4 . Write a PHP Script To Get & Store Group of Input Fields Data
You can use the following PHP script to get the values from the dynamic group of input fields, you can store them into database.
I am currently not focusing on how to store values into database, if you do not have any idea on how to store values into database then you can check out my other tutorial about insert data into database.
if ($_SERVER['REQUEST_METHOD'] == 'POST'){
    if (!empty(array_filter($_POST['employee_name'])) ||
        !empty(array_filter($_POST['designation']))){
        if (is_array($_POST['employee_name'])) {
            foreach($_POST['employee_name'] as $key => $employee_name) {
                $designation = $_POST['designation'][$key];
                // Your database insertion code will be here
                echo $employee_name . " " . $designation;
                echo "<br>";
                }
        }
    }
}
Keep this code in the head/top section of your page, as you can see above. Currently it will display all the submitted values on the screen, you can store them into your database table.
Although, the form is completed now, but I want to display all the input data into html input fields, this is important when you are validating input data before insertion and found any error, then you should display user entered data into input fields.
So that user should not need to fill the entire data again, this could be very frustrating for users to enter all the form data again.
5. Display Filled Form Data into HTML Form After Form Submit
Use the below code, instead of Step#01 code, because it will display filled form data into HTML form after the form submit but it will also display form when user open it for the first time.
<form name="FormData" method="post" action="" >
<table border="0" width="100%" class="table" id="employee_table">
    <tbody>
        <tr><th>Employee Name</th><th>Designation</th><th style="width:96px;">Action</th></tr>
<?php
$total_employee=1;
if ($_SERVER['REQUEST_METHOD'] == 'POST' &&
    (
        !empty(array_filter($_POST['employee_name'])) ||
        !empty(array_filter($_POST['designation']))
     ) ){
    if (is_array($_POST['employee_name'])) {
        $total_employee = count($_POST['employee_name']);
        $i = 1;
            foreach($_POST['employee_name'] as $key => $employee_name) {
                $designation = $_POST['designation'][$key];
                ?>
                <tr>
                <td>
                    <input type="text" id="employee_name<?php echo $i; ?>"
                           name="employee_name[]" placeholder="Javed Ur Rehman"
                           value="<?php echo $employee_name;?>" />
                </td>
                <td>
                    <input type="text" id="designation<?php echo $i; ?>"
                           name="designation[]" placeholder="Web Developer"
                           value="<?php echo $designation;?>" />
                </td>
                <td>
                <?php
                if($i==$total_employee && $total_employee!=1) {
                        echo '<button class="remove_employee">Remove</button>';
                    }
                ?>
                </td>
                </tr>
                <?php
                $i++;
                }
            }
        }else{
        ?>
                <tr>
                <td>
                    <input type="text" id="employee_name1"
                           name="employee_name[]" placeholder="Javed Ur Rehman" />
                </td>
                <td>
                    <input type="text" id="designation1"
                           name="designation[]" placeholder="Web Developer" />
                </td>
                <td></td>
                </tr>
        <?php } ?>
    </tbody>
</table>
<button class="add_employee">Add More Employee</button>
<br><br>
<input type="submit" value="Submit">
</form>
Now you know, how to add remove group of input fields dynamically. After that you should also learn how to validate dynamically added group of input fields using jQuery & PHP.
Conclusion
I hope by now, you know how to add remove group of input fields dynamically using jQuery and PHP. I tried to explain each steps as simple as possible. However, if you still face any issue, share it in the comment section below.
If you found this tutorial helpful, share it with your friends and developers group.
I spent several hours to create this tutorial, if you want to say thanks so like my page on Facebook, Twitter and share it.
Facebook Official Page: All PHP Tricks
Twitter Official Page: All PHP Tricks


I am getting the error “mail() has been disabled for security reasons ajax.php on line 22” in the ajax.php file..
I don’t know enough about ajax.
Is there anything I need to change in this line?
Or where am I going wrong?
Check the code first on xampp, test if it is working on localhost or not.