Simple Laravel 10 Database Seeder Tutorial
In this tutorial, we will learn about Laravel Database Seeder by creating a simple and useful Laravel 10 Database Seeder class via PHP artisan with simple and easy step by step guide.
Although, this tutorial is focused on Laravel 10 version. However, you can use the same with Laravel’s previous versions such as Laravel 7, Laravel 8, and Laravel 9 as well.
In this tutorial, we will show you how to create a simple Laravel 10 database seeder with example.
But first, you should know that what is database seeder in Laravel and why do you need Laravel database seeder.
Readers Also Read: Laravel 10 User Roles and Permissions
What is Laravel Database Seeder?
Laravel provides a convenient way to seed database which means to insert some testing or required data into your database which is known as database seeder or database seeding.
Suppose you need some data to test your application so you can seed your database with dummy data.
Sometimes, we also use Laravel Factory to generate fake or dummy data and add them into our tables.
Although, seeding is not only for dummy or fake data. Sometimes your application need some required data to proper function.
For example, if you are building a course registration app so you will need to add some courses data into the database.
Or if you are developing a registration form which requires user to select country, state and city, then you will need to seed these countries, states and cities data into your database.
Otherwise your application will not work correctly because it need some required data to work properly.
Although, you can add these data manually via MySQL. However, this is not a recommended way to add data into database in Laravel.
Readers Also Read: How to Install Laravel on Windows 11
So lets learn the correct way of seeding data into Laravel 10.
Steps to Create Laravel 10 Database Seeder
Follow the below simple steps to create a simple Laravel 10 Database Seeder.
- Install the Laravel 10 App
- Configure Database Credentials
- Create a Seeder Class in Laravel
- Migrate Tables to Database
- Running Seeder to Seed Database
1. Install the Laravel 10 App
Open the command prompt window and go to the directory where you want to install Laravel 10 app. For example like below.
cd desktop\workspaceAlthough, this step is optional, if you already have installed Laravel then you can skip it.
After coming to your desired directory run the below command to install Laravel.
composer create-project --prefer-dist laravel/laravel:^10 laravel-seederAfter successfully installing the Laravel, move to your Laravel installation directory by running the below command.
cd laravel-seeder2. Configure Database Credentials
In this second step, make sure that you configure your database credentials for Laravel 10 database seeder example tutorial.
Just go to the root of your application and update the .env file.
Open the .env file and enter your own database credentials details such as database name, db user and db password.
Readers Also Read: How to Install XAMPP on Windows
Database Credentials:
DB_CONNECTION=mysql
DB_HOST=127.0.0.1
DB_PORT=3306
DB_DATABASE=your_db_name
DB_USERNAME=your_db_username
DB_PASSWORD=your_db_password
3. Create a Seeder Class in Laravel
Now, we will create a UserSeeder class to seed our database table user, User Model and Migration are comes with the default Laravel installation.
Therefore, we will not create model and migration for our seeder and we will focus only to seeding database.
Run the below command to create our UserSeeder class.
php artisan make:seeder UserSeederThis will create a UserSeeder.php file in database/seeders directory.
We have an option to either user Laravel query builder or eloquent to insert data into our table. We prefer to stick with the eloquent model and mass assignment is disabled in database seeders.
So just copy and paste the below code in UserSeeder.php file.
<?php
namespace Database\Seeders;
use Illuminate\Database\Seeder;
use App\Models\User;
use Illuminate\Support\Facades\Hash;
class UserSeeder extends Seeder
{
/**
* Run the database seeds.
*/
public function run(): void
{
// Create Sample Dummy Users Array
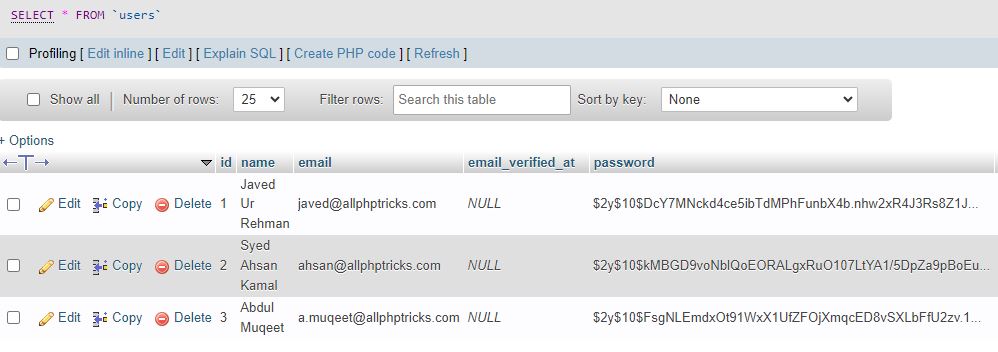
$users = [
[
'name'=>'Javed Ur Rehman',
'email'=>'[email protected]',
'password'=> Hash::make('javed1234')
],
[
'name'=>'Syed Ahsan Kamal',
'email'=>'[email protected]',
'password'=> Hash::make('ahsan1234')
],
[
'name'=>'Abdul Muqeet',
'email'=>'[email protected]',
'password'=> Hash::make('muqeet1234')
]
];
// Looping and Inserting Array's Users into User Table
foreach($users as $user){
User::create($user);
}
}
}As you can see above, we have created array of three users, you can use the above array method to insert either single or multiple records.
4. Migrate Tables to Database
Now, first we need to migrate Laravel tables into our database.
Just run the below command in terminal to migrate all tables to our database.
php artisan migrate5. Running Seeder to Seed Database
There are two ways to seed our UserSeeder data to our database.
- Run Single Seeder Method
- Run All Seeder Method
a) Run Single Seeder Method
You can run any single seeder using the below command just by replacing the class name.
php artisan db:seed --class=UserSeederIn the above example, class name is UserSeeder. The above command will seed our UserSeeder into our database in user table.
After running the above command, check your user table in database to verify the data in database.
At this point, we have successfully created and run the Laravel 10 database seeder with User Seeder example.
Bonus Tips:
Alternatively, you can also use the below command to seed your specific seeder but this command will also drop all tables if exist in your database and then re-run all your migrations and seed your specific seeder.
You can skip the step 4 if you are using the below command.
php artisan migrate:fresh --seed --seeder=UserSeederThe above command is very useful, if you are completely rebuilding your database along with seed but make sure that it will delete all of your tables data before re-migrating and seeding.
b) Run All Seeder Method
In this method, we can run all seeders in a single command and we can also set the sequence of seeders.
There is a default DatabaseSeeder.php file in database/seeders directory.
Just open this file and paste the following code in it.
<?php

namespace Database\Seeders;

use Illuminate\Database\Seeder;

class DatabaseSeeder extends Seeder
{
    /**
     * Seed the application's database.
     */
    public function run(): void
    {
        $this->call([
            UserSeeder::class,
        ]);
    }
}
We can define multiple seeders in the call method in array in DatabaseSeeder.php file and all seeders will be seeded in our database.
After that run the below command.
php artisan db:seedAlternatively, you can also use the below command to seed all seeders along with rebuilding the database by dropping all the tables and then re-migrate them into our database.
php artisan migrate:fresh --seedConclusion
By now we hope that you have learnt how to create a simple Laravel 10 database seeder with UserSeeder example tutorial by following the above step by step guide.
If you found this tutorial helpful, share it with your friends and developers group.
I spent several hours to create this tutorial, if you want to say thanks so like my page on Facebook, Twitter and share it.
Readers Also Read: Laravel 10 REST API using Passport Authentication
Facebook Official Page: All PHP Tricks
Twitter Official Page: All PHP Tricks